Introduction
This guide serves as a resource to users needing direction in navigating the all our theme for opnecart 4.x.x interface.
Eg: So Emarket, So Xtore, So Entry...
Congratulations on your purchase of an OpenCart template! This documentation consists of several parts and describes the installation, configuration and setting up an OpenCart website process.
We did our best to make this manual information to be presented in a simple way. As an effective reference, the documentation below will provides all information you need, it has been restructured in different chapters, you can see in the left-side menu. You are able to navigate to any part of the documentation using the active content headers' links.
We recommend that you should start reading the documentation at the first section.
Top Ultimate opencart 4 themes
What is OpenCart?
OpenCart — is an Open Source e-commerce application. OpenCart provides easy customization of your online store. OpenCart community includes a number of users starting from the experienced web developers looking for the user-friendly interface, ending with shopkeepers that start their online business for the first time. OpenCart provides a great amount of features that allow you to control your store. Using OpenCart tools you can easily uncover the store potential.
Document Opencart What`s new in Opencart 4
Note
Usually there is a vast of different settings that available with a new Template, and because this is an open source software, it isn't always the same for each developer. Make sure to read through this documentation available for the Template that you are installing so that you know what features are available for you.
System Requirements
System Requirements for Opencart:
Click here Note: Opencart 4 Requirements Software: PHP 8.1+ (8.1+ recommended)Note:
Make sure your PHP value requirements look like:
max_execution_time=3000
max_input_vars = 25000
post_max_size=350M
upload_max_filesize=200M
Make sure your MYSQL value requirements look like:
max_allowed_packet=16M
How to install OpenCart
You read user-guide to install default OpenCart:
Click hereHow to install So Theme for OpenCart 4
User-guide to install So Theme. It is the same, please refer here:
Video to view user-guide to install So Theme
1. Extensions Installer
- Unzip the theme package file eg with version: so_xxx_theme_oc4xxx.UNZIPFIRST.zip file to get the files: so_xxx_.ocmod.zip and image.zip
- Go to Extensions › Installer › Click Upload and select the so_xxx.ocmod.zip file to upload and wait to the message.Then you will see the message Success: The extension has been uplloaded!

Note:
If you can't upload success. Please upload the so_xxx.ocmod.zip file to: system/storage/marketplace/ folder.
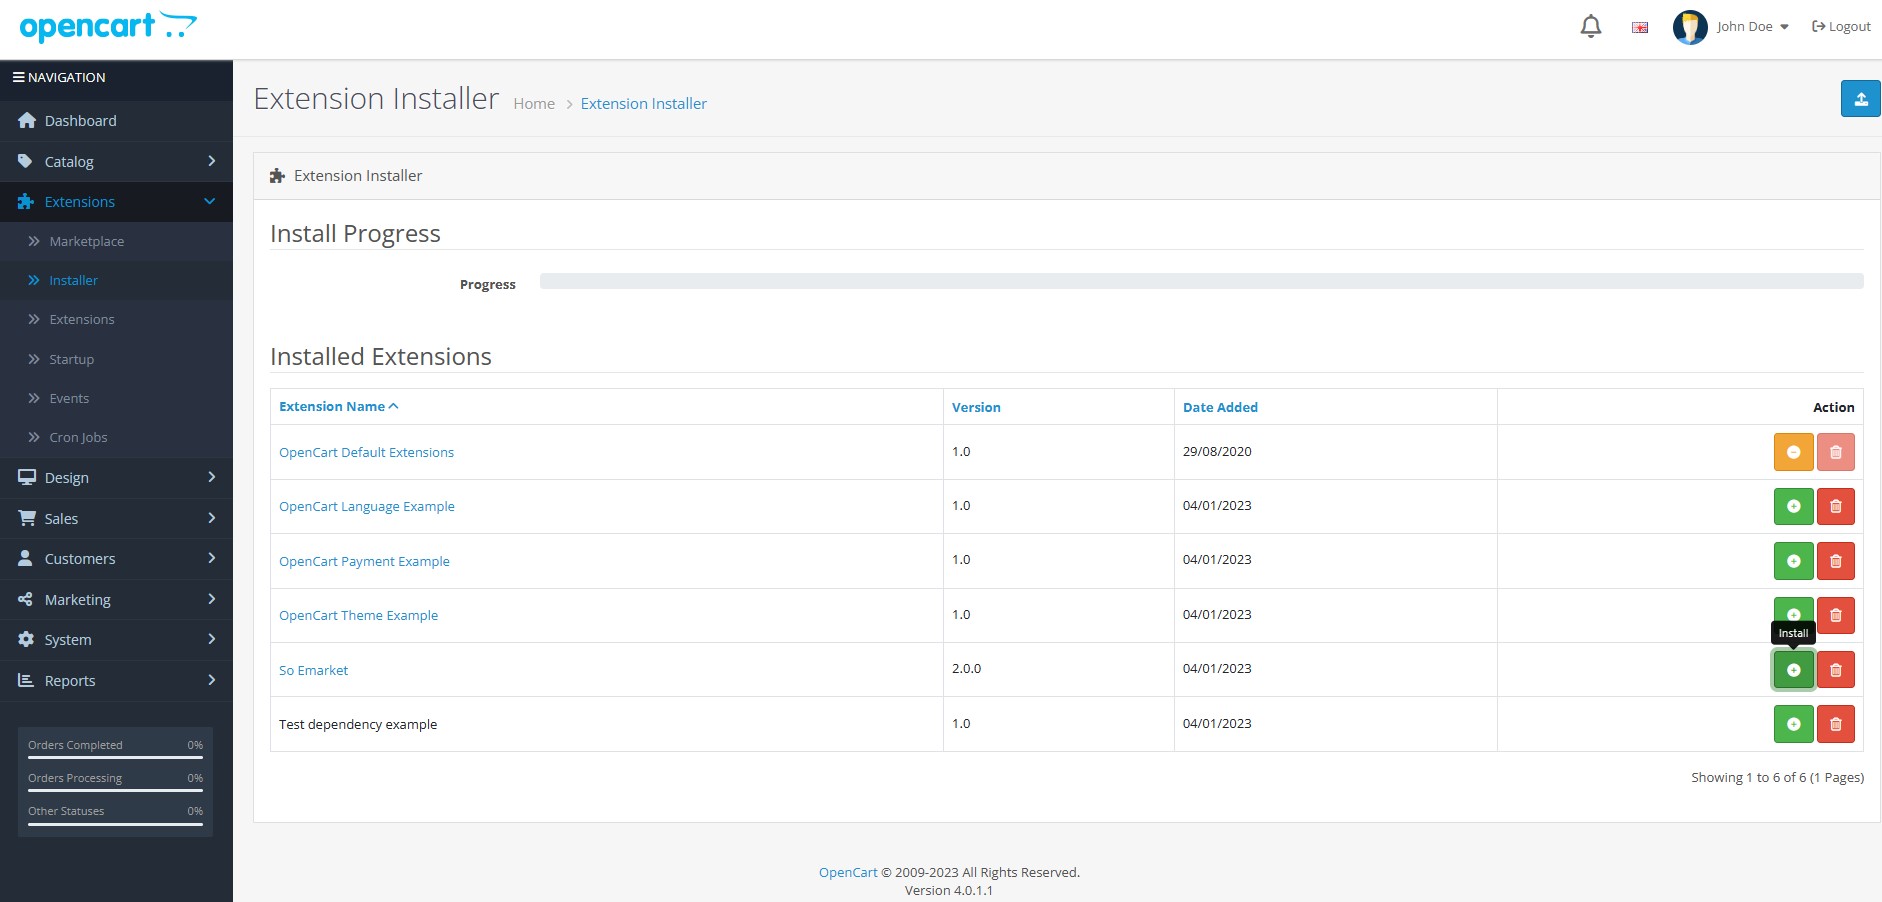
The next, please Click install So xxx theme (eg theme: So Emarket, So Xtore, So Entry...)
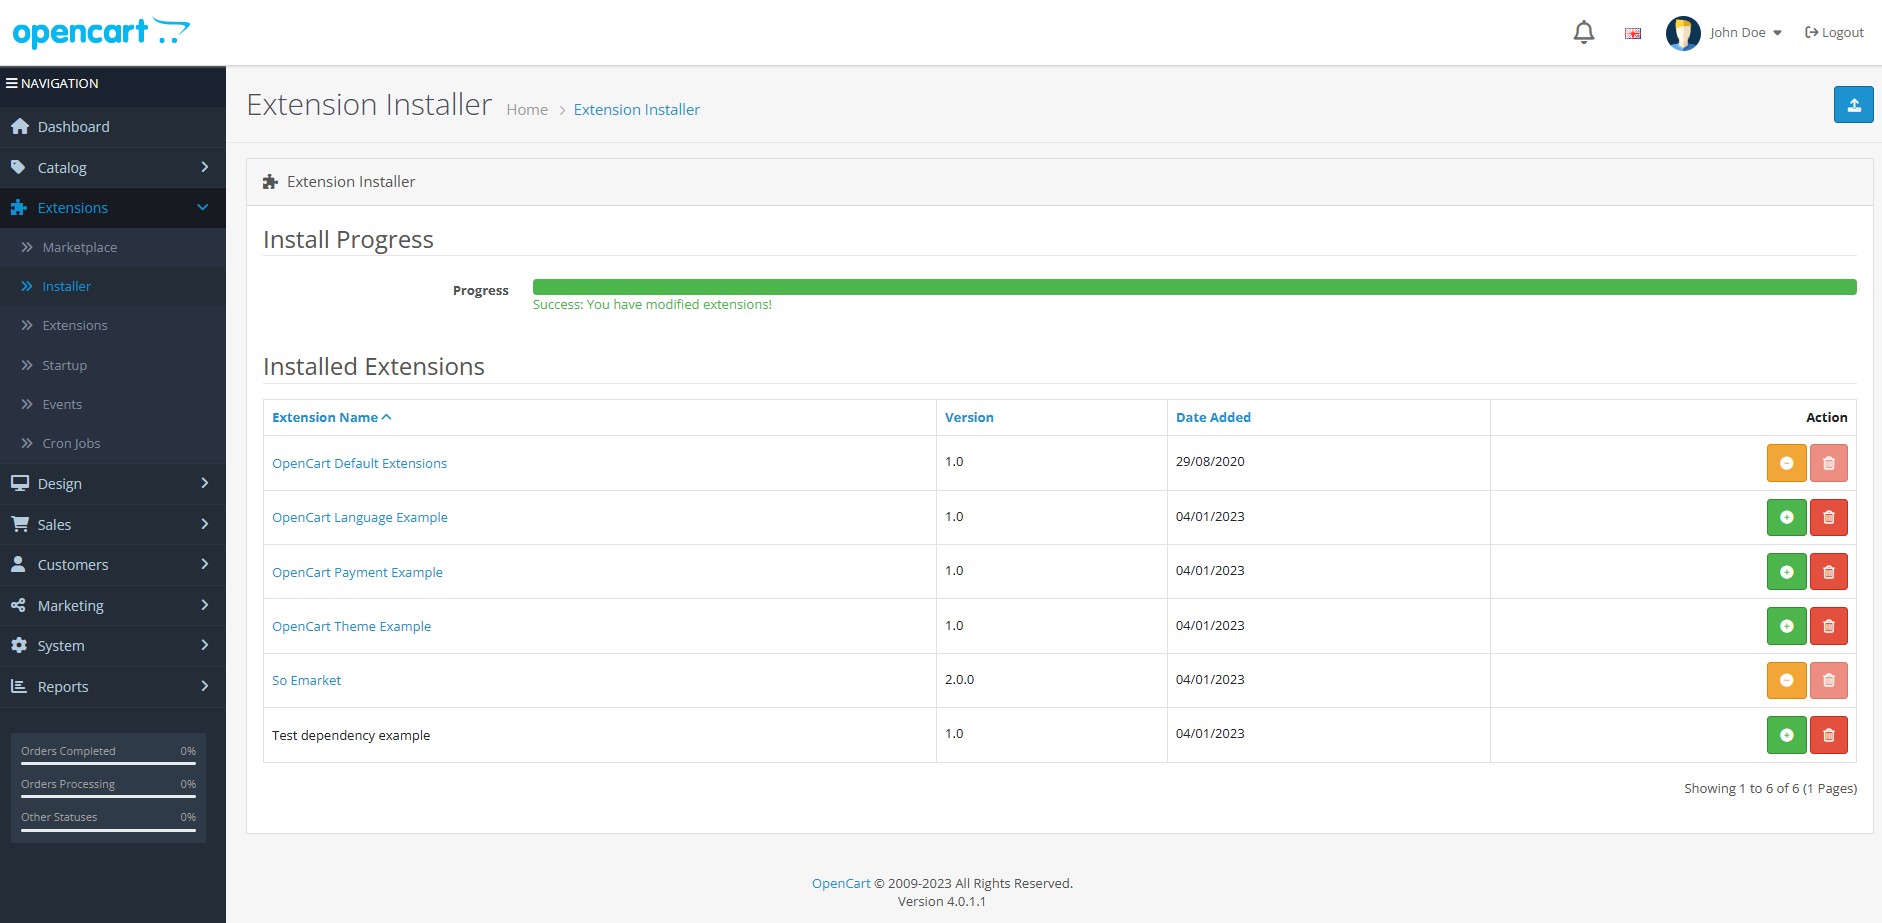
Then you will see the message Success: You have modified extensions!
2. Extensions Active
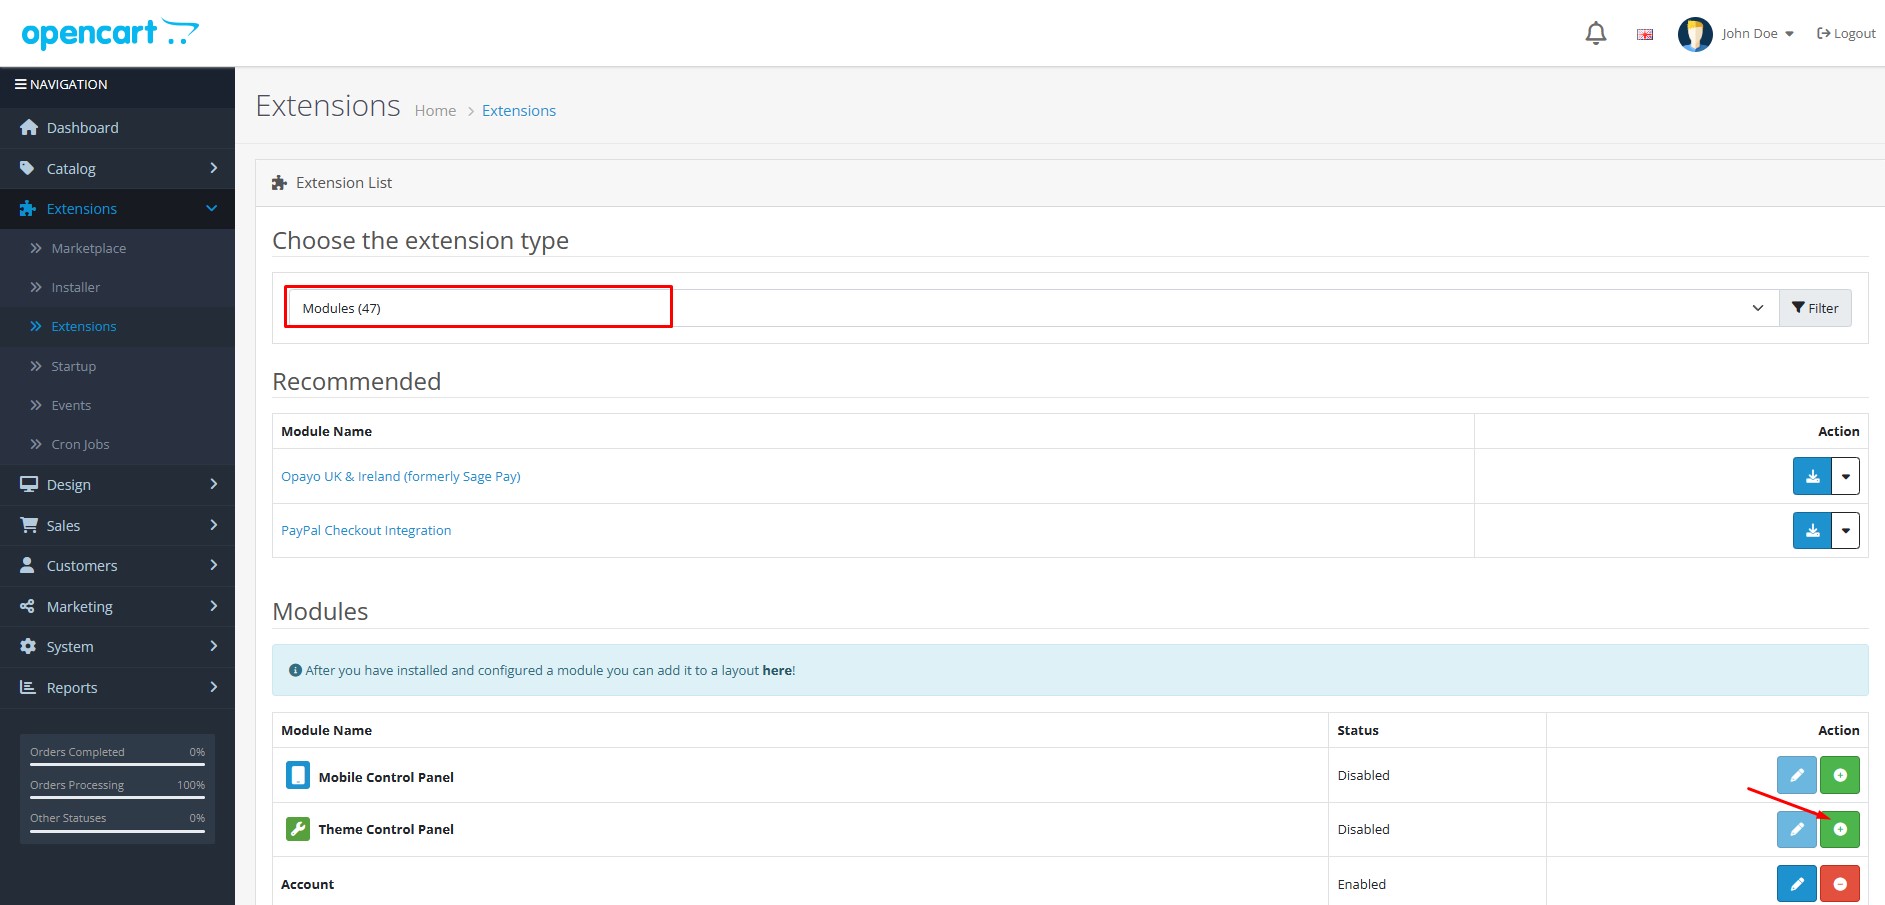
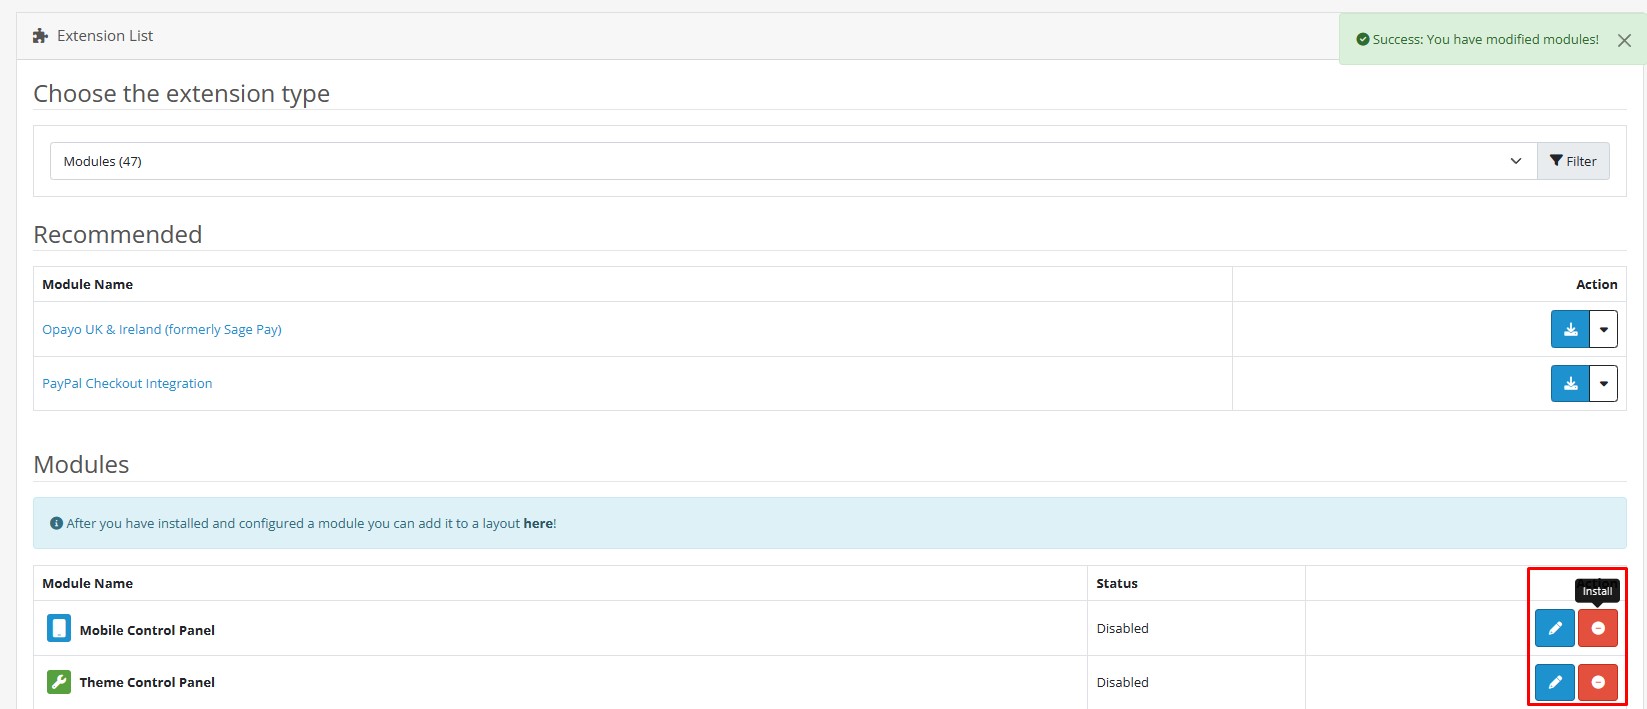
Go to Extensions › Extensions > Choose the extension type Module › Click Install button on Theme Control Panel
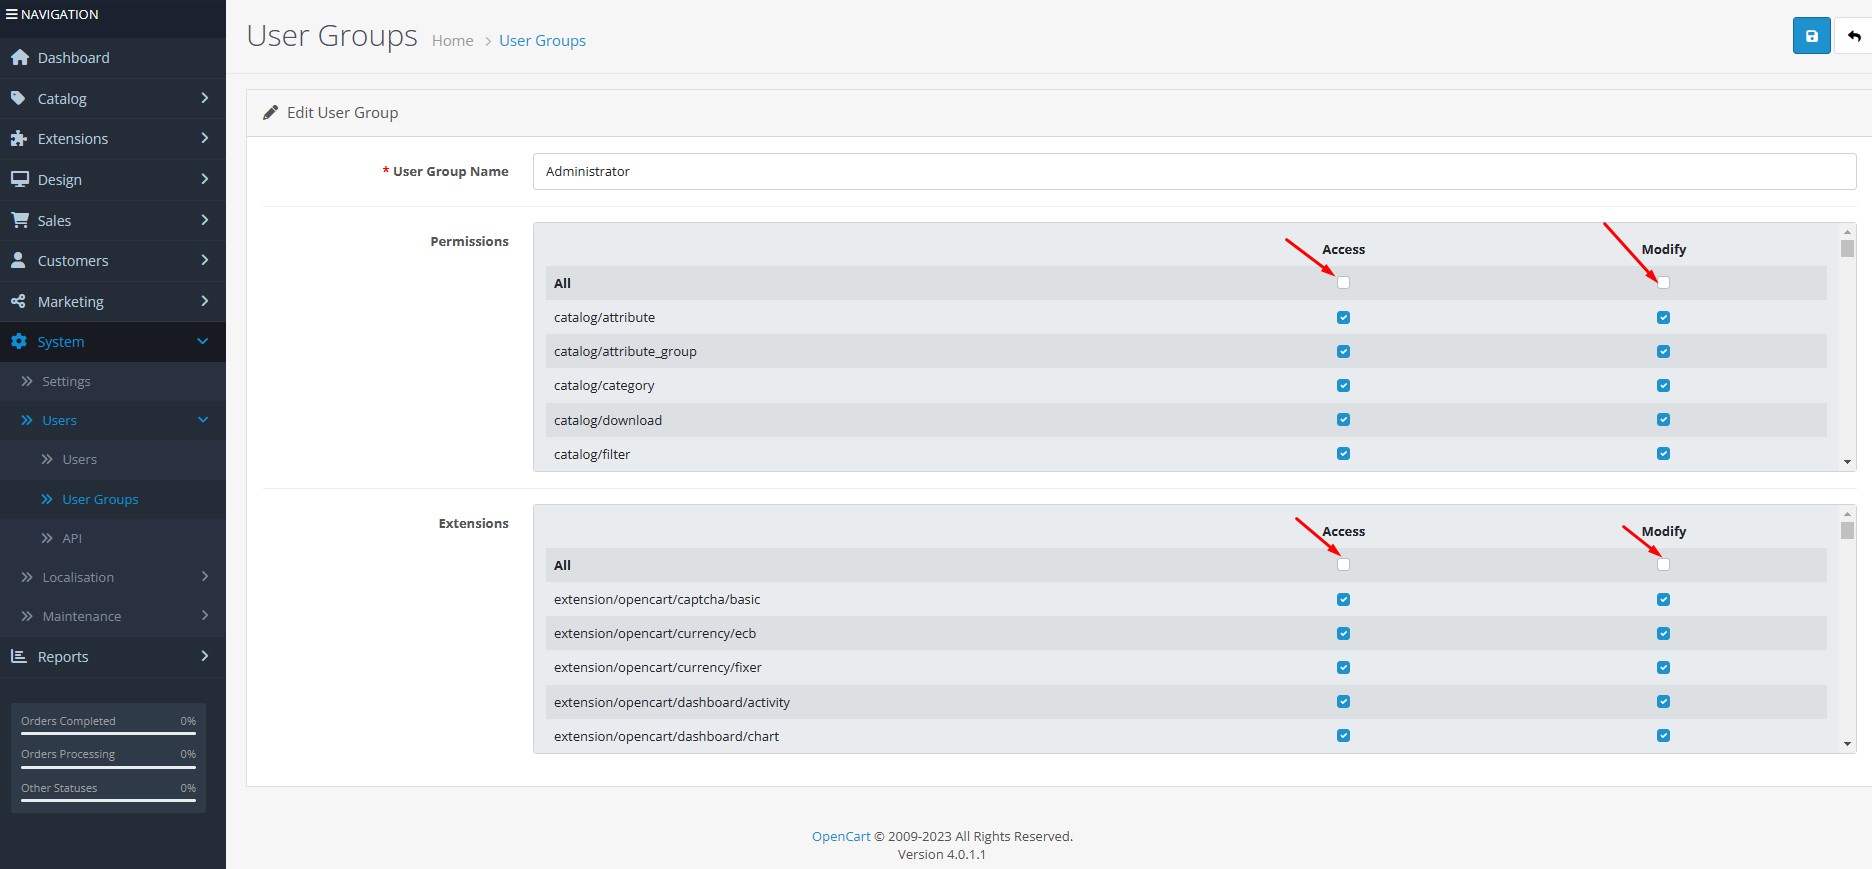
3. Access Permission
Go to System › User › User Group › Click Edit button › Then you click Select All button and click the Save button
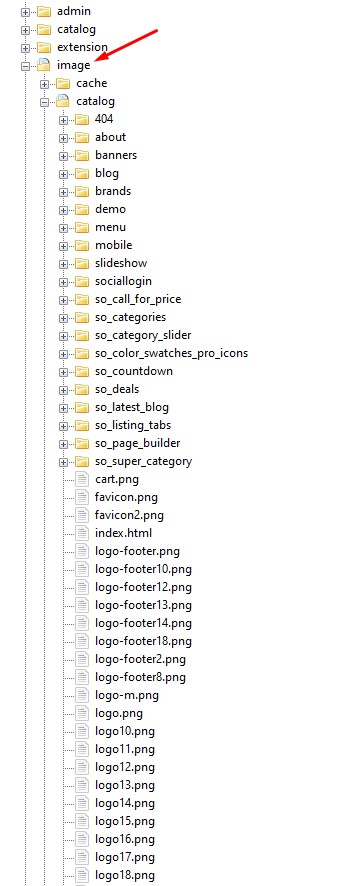
4. Image demo
Please upload the image.zip file to your root file. Use cpanel account to unzip it. Move all folders in the ‘image’ folder >> the ‘image’ Root folder
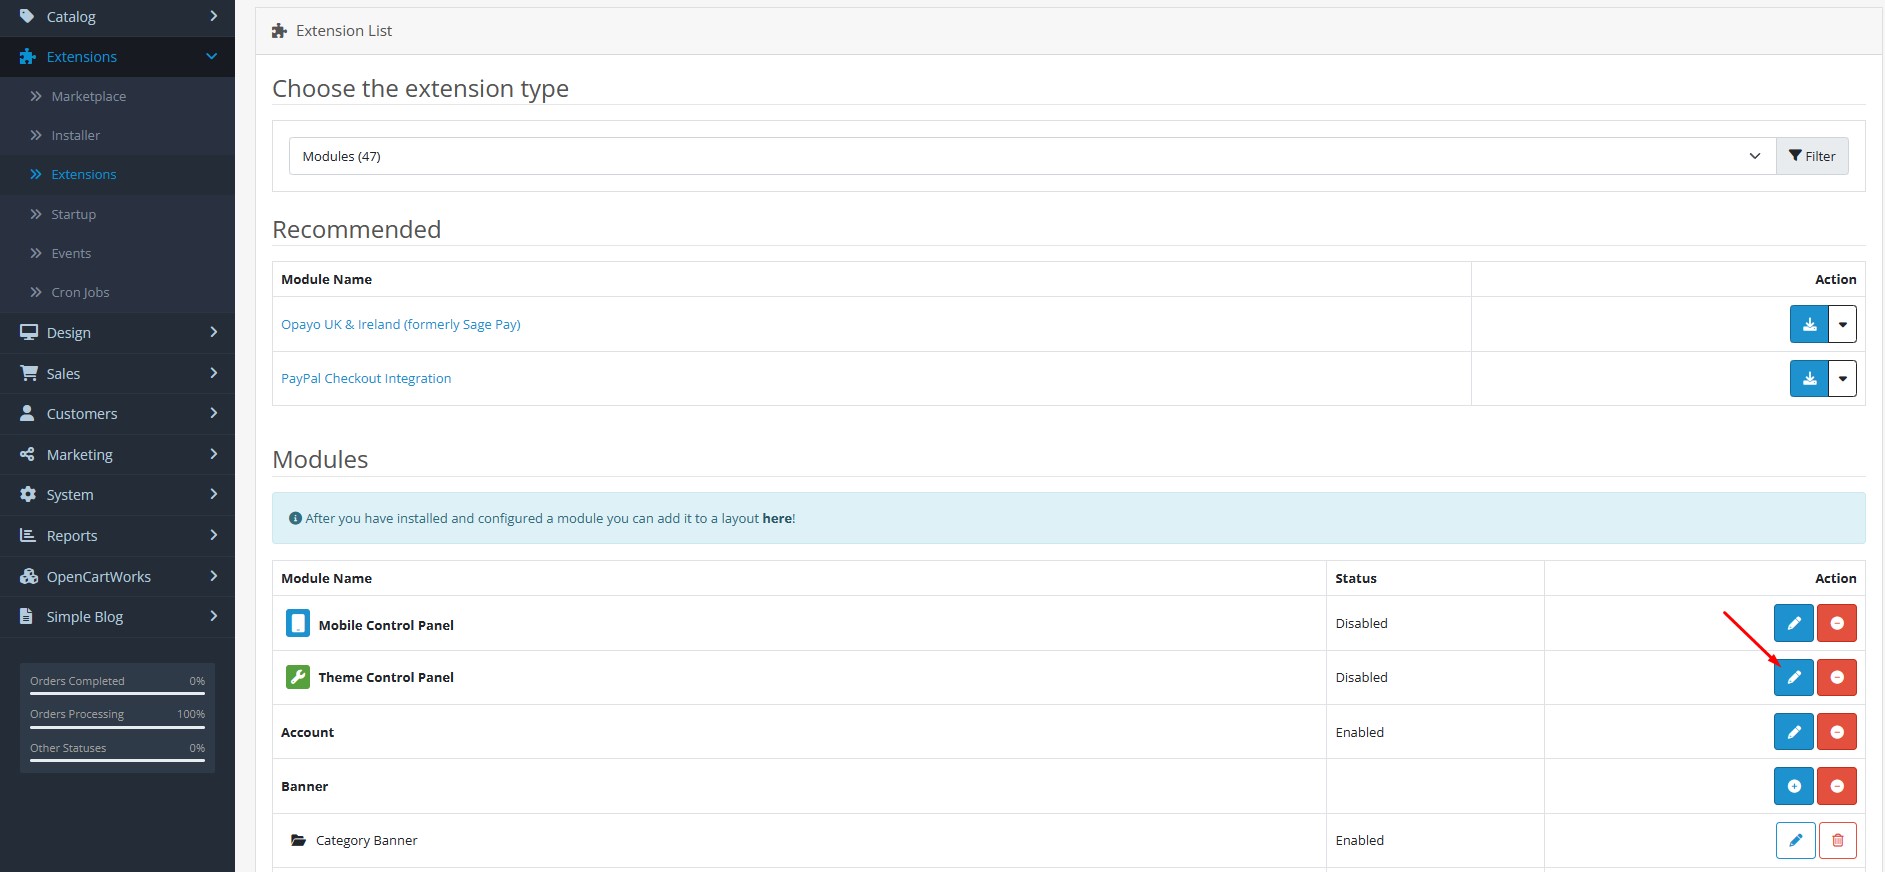
5. Theme Control Panel
Go to Extensions › Extensions > Choose the extension type Module › Click Editthe button on Theme Control Panel
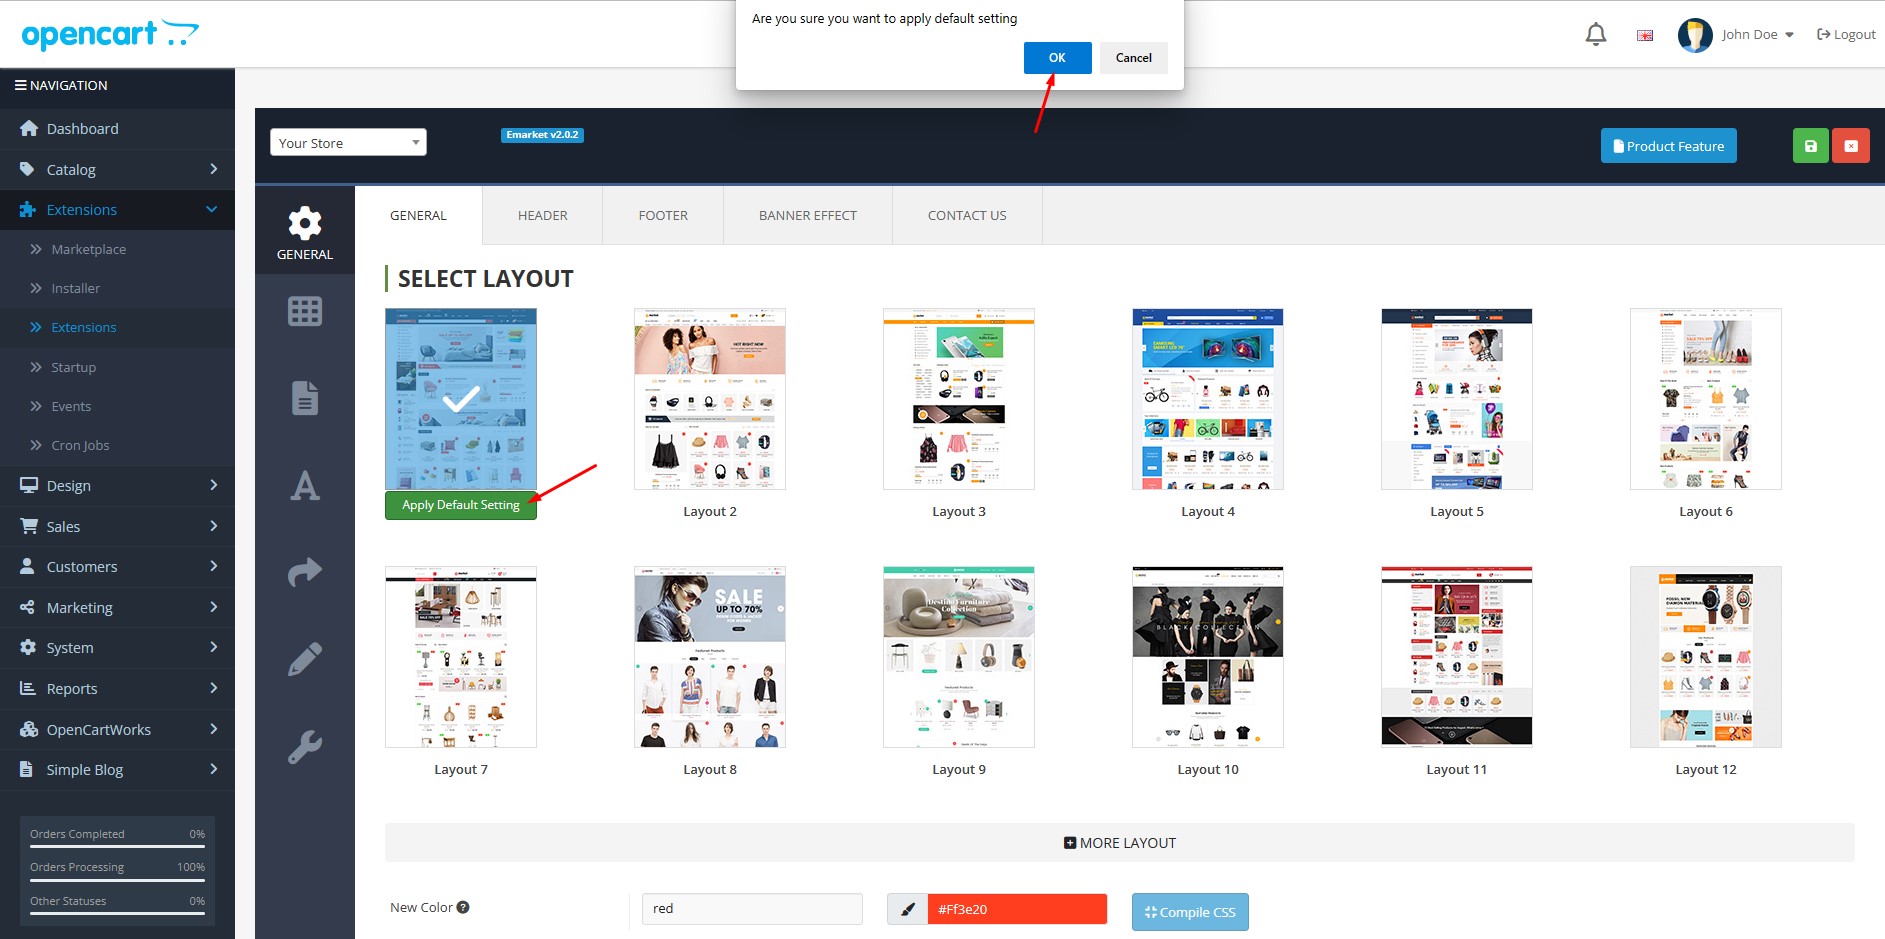
then select your layout by click: Apply Default Setting button on General Tab then click the Save button
Override Language
1.How to manage content, products and categories translations
Note
When you install multi language the default language is arabic, it is not an error. Please You enter your content
-
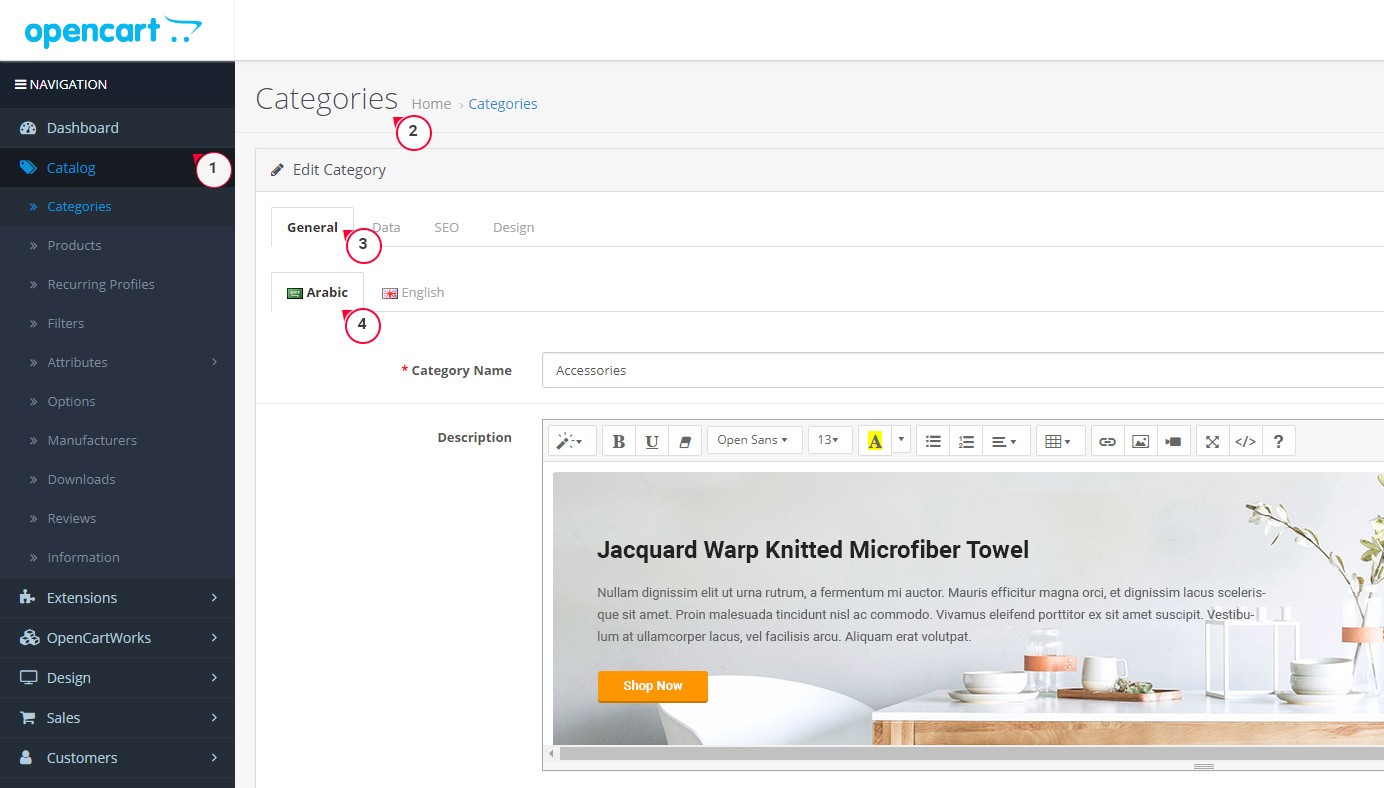
Usually, Opencart top menu displays Categories. Navigate to Catalog › Categories, select the category you would like to translate, click the Edit icon and insert translation into corresponding language tab of the category:
-
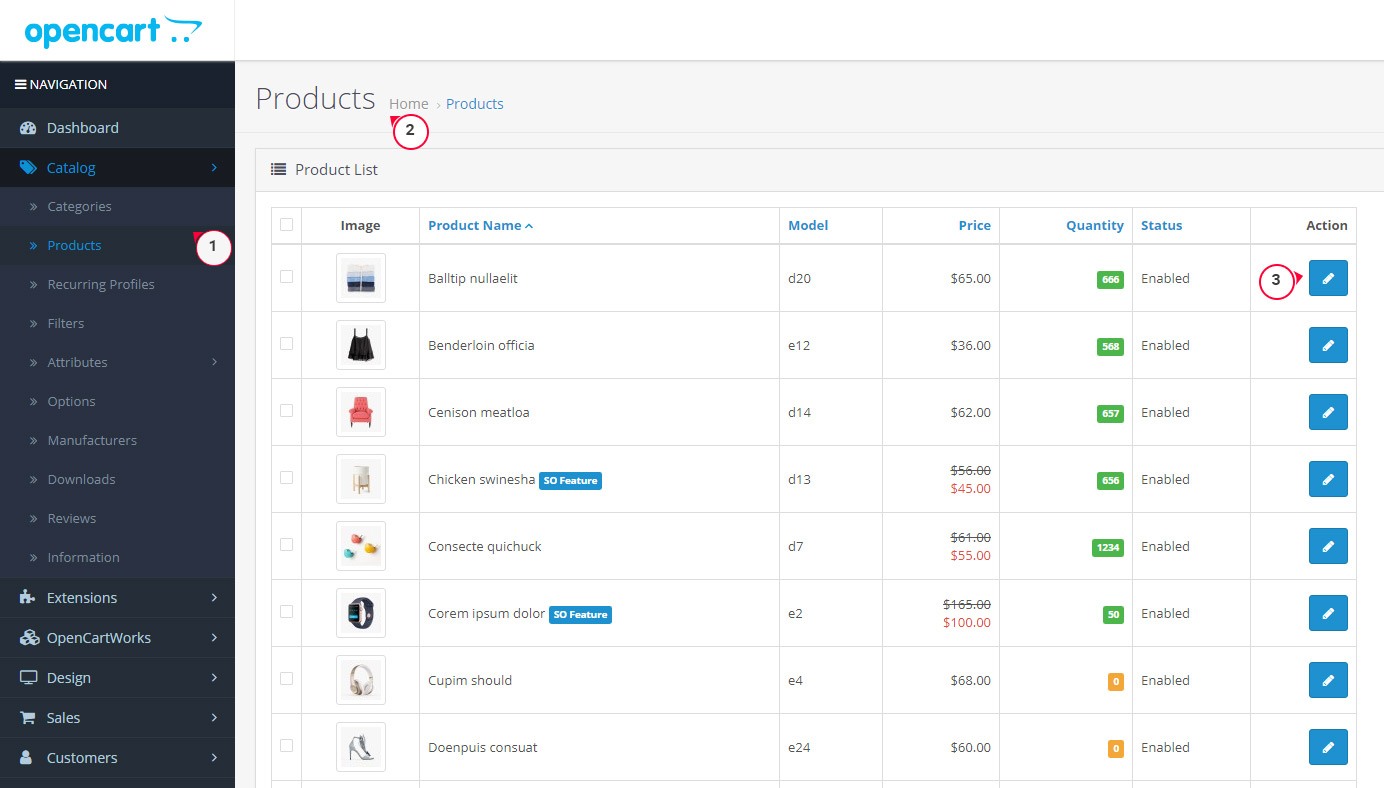
Navigate to Catalog -> Products to start products translation. Select the product you would like to translate, click the Edit icon next to it and insert translations into the General tab of a product:
- In case you would like to translate one of content pages on the site, open the Catalog -> Information tab, select the page required and insert translations into the corresponding language tab of content editor.
-
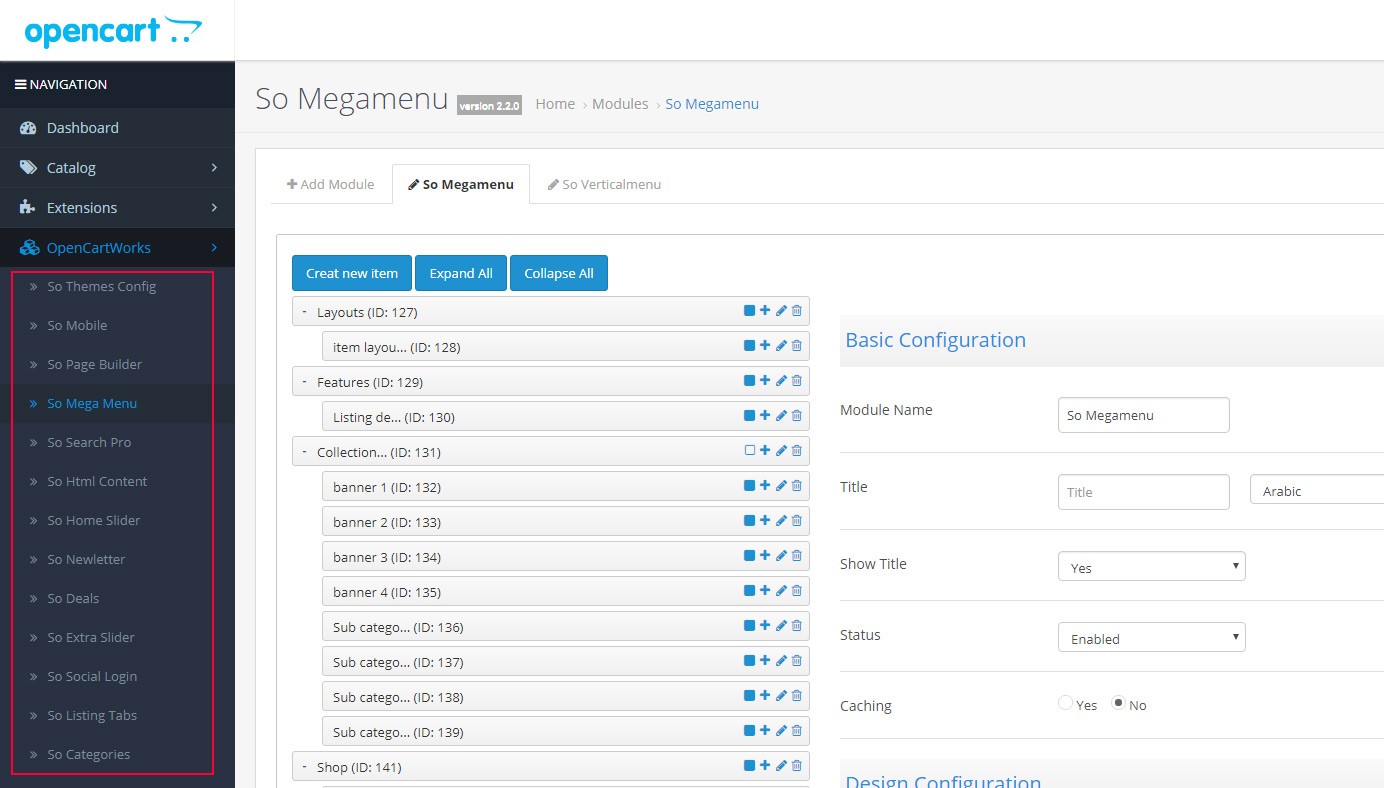
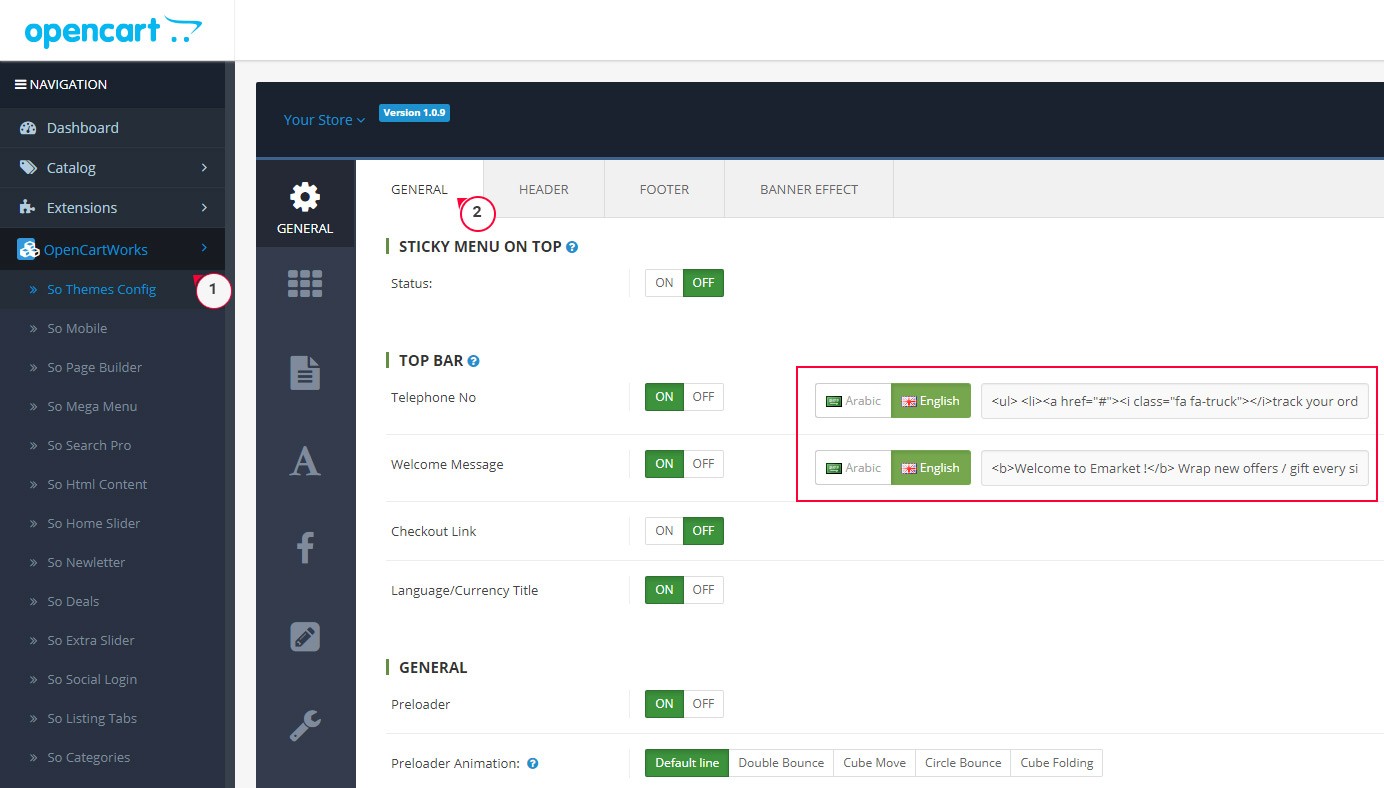
Navigate to Opencartworks -> So Themes Config to start translation, insert translations into the content:
Note
Because there are so many modules, Select the module you would like to translate. Insert translations into the content
- Refresh the front-end with the Ctrl/Cmd+F5 hotkeys to check the changes.
3. How to use translate Language in our Module
If the module has language files for English and you want to translate them for Spanish, then at the very first copy all the language files from English language directory and paste all of them in Spanish directory in the same structure as it was in English language.
- Extract the language archive file which you downloaded into your PC:
patch_language_oc4.x -
We filter out language files of theme and modules:
- patch_language_oc4.x\extension\so_theme\admin\language\en-gb
- patch_language_oc4.x\extension\so_theme\catalog\language\en-gb
To your language: replace "en-gb" with the Locale of your language (English, German, Spanish, Arabic ...).
- Upload this extension folders you into \extension\oc_arabic_language\extension\ folder
-
Then please go to \extension\oc_arabic_language\extension\so_theme\catalog\language\ar\module\ => you make translates language all files
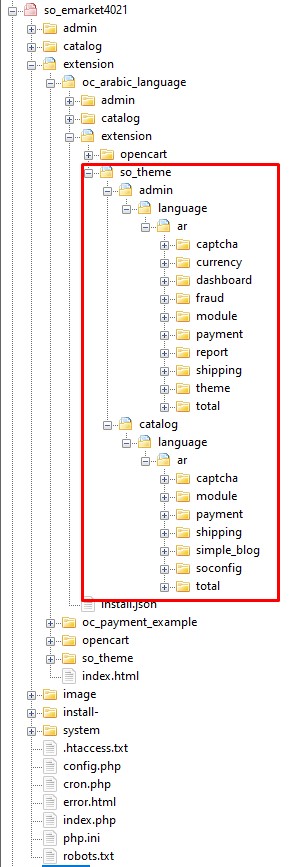
- Refresh the front-end with the Ctrl/Cmd+F5 hotkeys to check the changes.
Speed Up opencart store page
1. Minify / gzip the CSS, Javascript and Jquery files, enable browser caching
This is the most important part when optimize OpenCart speed that you need to minify CSS, javascript and other files using gzip/ Enable GZIP Compression, enable browser caching.
Secondly, rename htaccess.txt to .htaccess in your OpenCart directory.
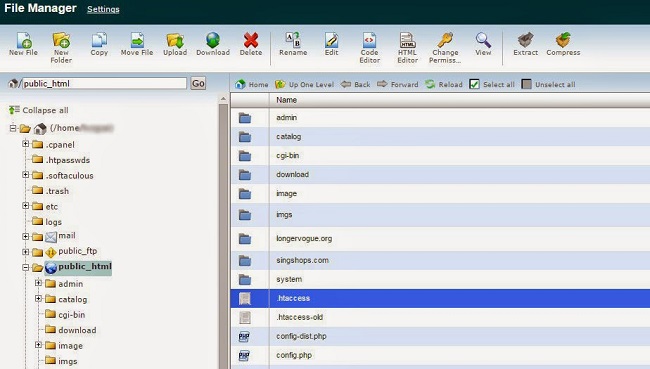
Then, open the .htaccess file and add the following code underneath the ReWrite rules
# Compress HTML, CSS, JavaScript, Text, XML and fonts
AddOutputFilterByType DEFLATE application/javascript
AddOutputFilterByType DEFLATE application/rss+xml
AddOutputFilterByType DEFLATE application/vnd.ms-fontobject
AddOutputFilterByType DEFLATE application/x-font
AddOutputFilterByType DEFLATE application/x-font-opentype
AddOutputFilterByType DEFLATE application/x-font-otf
AddOutputFilterByType DEFLATE application/x-font-truetype
AddOutputFilterByType DEFLATE application/x-font-ttf
AddOutputFilterByType DEFLATE application/x-javascript
AddOutputFilterByType DEFLATE application/xhtml+xml
AddOutputFilterByType DEFLATE application/xml
AddOutputFilterByType DEFLATE font/opentype
AddOutputFilterByType DEFLATE font/otf
AddOutputFilterByType DEFLATE font/ttf
AddOutputFilterByType DEFLATE image/svg+xml
AddOutputFilterByType DEFLATE image/x-icon
AddOutputFilterByType DEFLATE text/css
AddOutputFilterByType DEFLATE text/javascript
AddOutputFilterByType DEFLATE text/xml

# Remove browser bugs (only needed for really old browsers)
BrowserMatch ^Mozilla/4 gzip-only-text/html
BrowserMatch ^Mozilla/4\.0[678] no-gzip
BrowserMatch \bMSIE !no-gzip !gzip-only-text/html
Header append Vary User-Agent


## EXPIRES CACHING ##

ExpiresActive On
ExpiresByType image/jpg "access 1 month"
ExpiresByType image/jpeg "access 1 month"
ExpiresByType image/gif "access 1 month"
ExpiresByType image/png "access 1 month"
ExpiresByType text/css "access 1 month"
ExpiresByType application/pdf "access 1 month"
ExpiresByType text/x-javascript "access 1 week"
ExpiresByType application/x-shockwave-flash "access 1 month"
ExpiresByType image/x-icon "access 1 month"
ExpiresDefault "access 1 month"

## EXPIRES CACHING ##

# gzip #

AddOutputFilterByType DEFLATE text/text text/html text/javascript text/plain text/xml application/xml text/css application/x-javascript application/javascript
# remove browser bugs
BrowserMatch ^Mozilla/4 gzip-only-text/html
BrowserMatch ^Mozilla/4\.0[678] no-gzip
BrowserMatch \bMSIE !no-gzip !gzip-only-text/html
Header append Vary User-Agent

# gzip end #
2. Minify the CSS, Javascript in SO Themeconfig
Go to admin › OpenCartWorks › So Themes Config › Advanced Tab
Setting value : Show Minify CSS = On, Show Minify JS = On
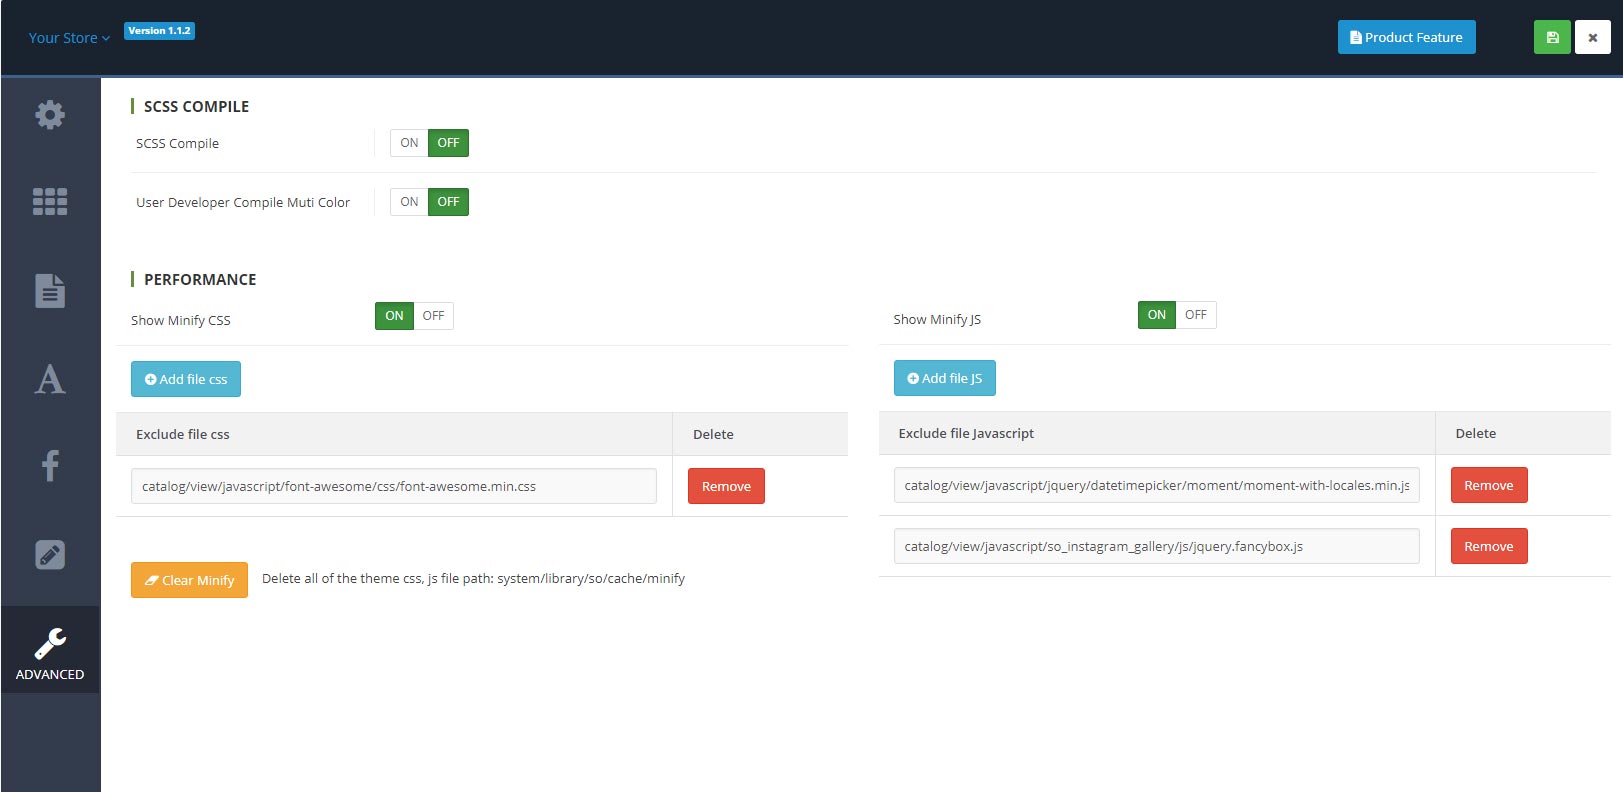
Theme Feature
Main General Tabs
Tab General
Go to OpenCartWorks › So Themes Config › General Tab
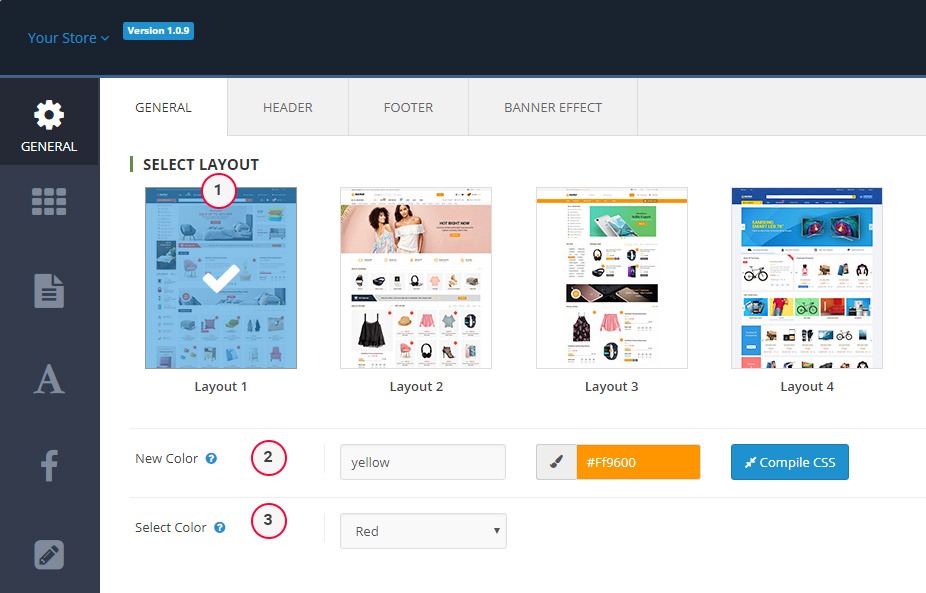
1.Select Layout - Choose the layout that you like. Click button Apply Default Setting Choose the Layout
New Color- Set name color (do not uppercase letters) and fill color. Continue Click button Compile CSS.Select Color- Select the color you just created › Click button Save
2.Sticky Menu on Top - When the user scrolls the page, Sticky Menu to the top of the browser window during scrolling

Status- Option (yes|no)Select Block on header- Choose your parts you want to show on the sticky Menu
3.Top Bar
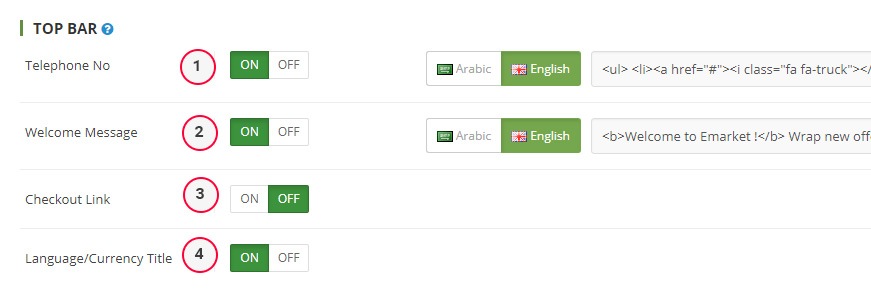
Telephone No- is the content of TelephoneWelcome Message- is the content of Welcome MessageCheckout Link- show the link checkoutLanguage/Currency- show the Language/Currency
View Frontend:

4.General
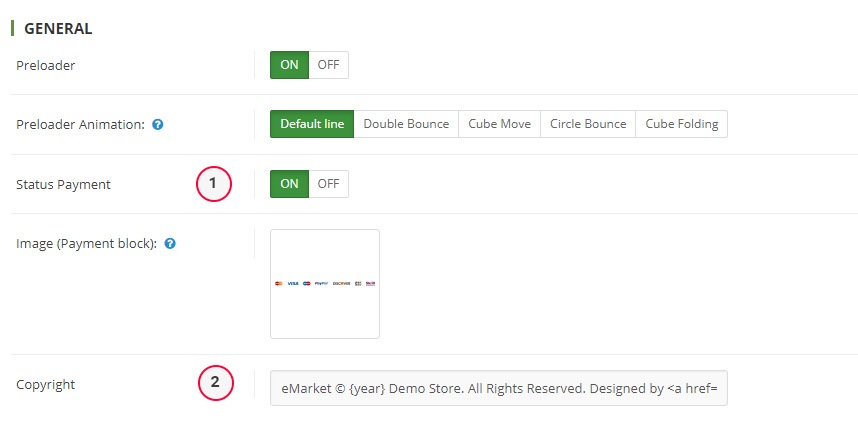
Preloader- want to show the PreloaderPreloader Animation- Choose the preloader that you likeStatus Payment- want to show the PaymentImage (Payment block)- Choose a image pathCopyright- It is the content to Copyright
View Frontend:
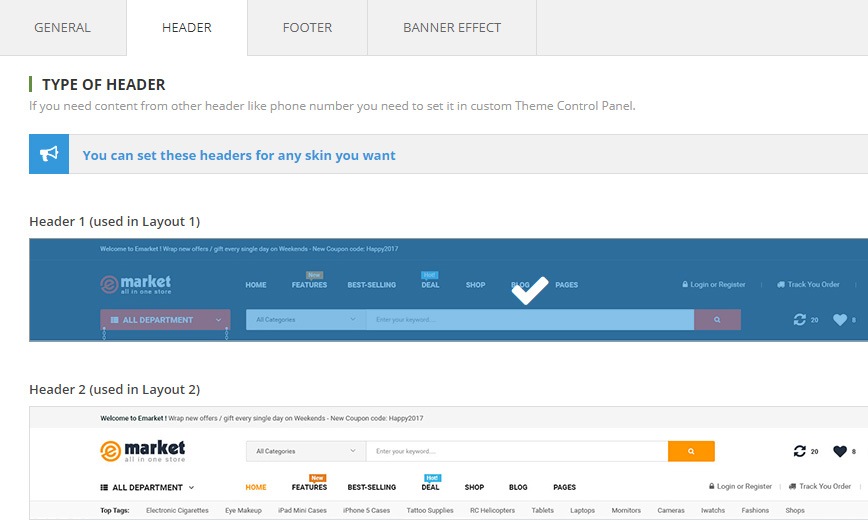
Tab Header & Footer
Choose the type of Header that you like, to pair with home page
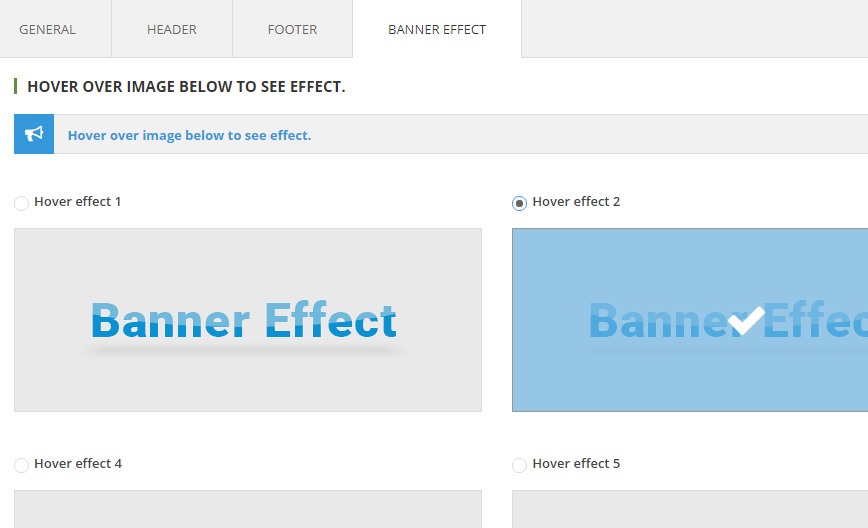
Tab Banner
Hover over image below to see effect.Choose the banner that you like
Layout Tab
Go to admin › OpenCartWorks › So Themes Config › Layout Tab › With the boxed layout you can choose additional options such as custom background images, patterns and solid colors
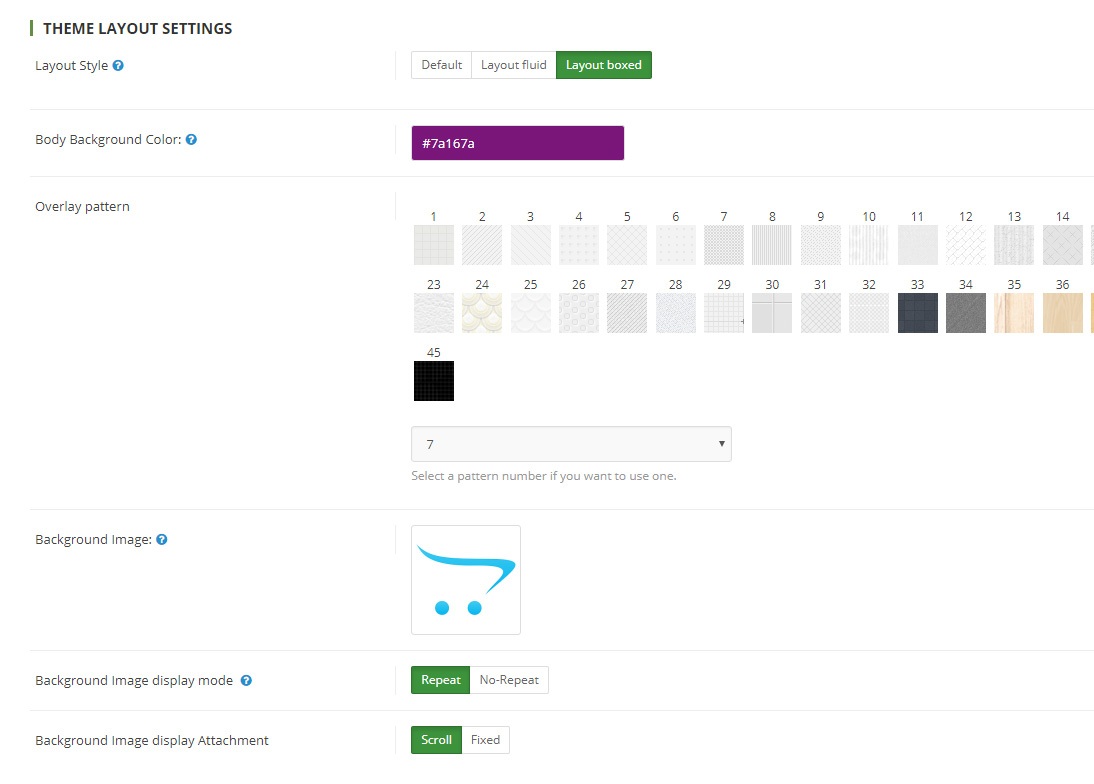
Layout Style- Select one in option (Default|Layout fluid|Layout boxed)Body Background Color- Set background color for MainbodyOverlay pattern- Set pattern image for MainbodyBackground Image:- Set background image for MainbodyBackground Image display mode- Set background image display modeBackground Image display Attachment- Set background image display attachment
View Frontend: Layout Style = boxed

Page Tab
Product Category
Go to admin › OpenCartWorks › So Themes Config › Page Tab › Product Category
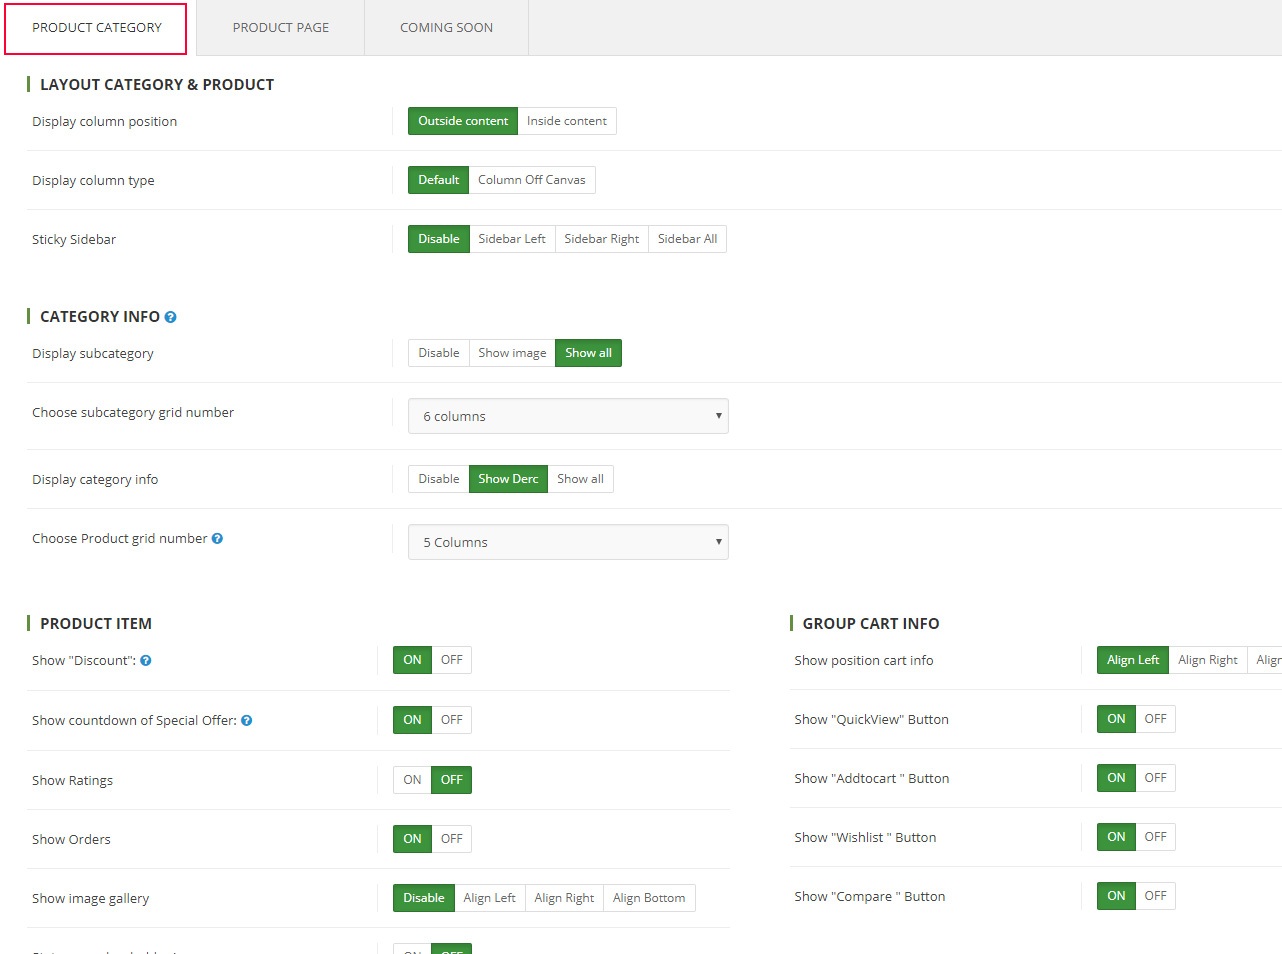
1.Layout Category & Product
Display column position- Select one in option ( Outside content| Inside content)Display column type- Add page content inside this div if you want the side nav to push page content to the rightSticky Sidebar- Attach sidebar to the page when the user scrolls such that the element is always visible
2.Category Info
Display subcategory- You want to show the subcategoryChoose subcategory grid number- Quantity is displayed subcategoryDisplay category info- You want to show description categoryChoose Product grid number- Column number display page category
3.Product Item
Show "Discount"- Options (yes/no)Show countdown- Show countdown of Special Offer productShow Ratings- Options (yes/no)Show Orders- show order number of productShow image gallery- Slider image galleryStatus use placeholder images- Options(yes/no)
4.Group Cart
Show position cart info- select align (Left|Right|Center|Bottom) position group cartShow "QuickView" Button- Options (yes/no)Show "Addtocart " Button- Options (yes/no)Show "Wishlist " Button- Options (yes/no)Show "Compare " Button- Options (yes/no)
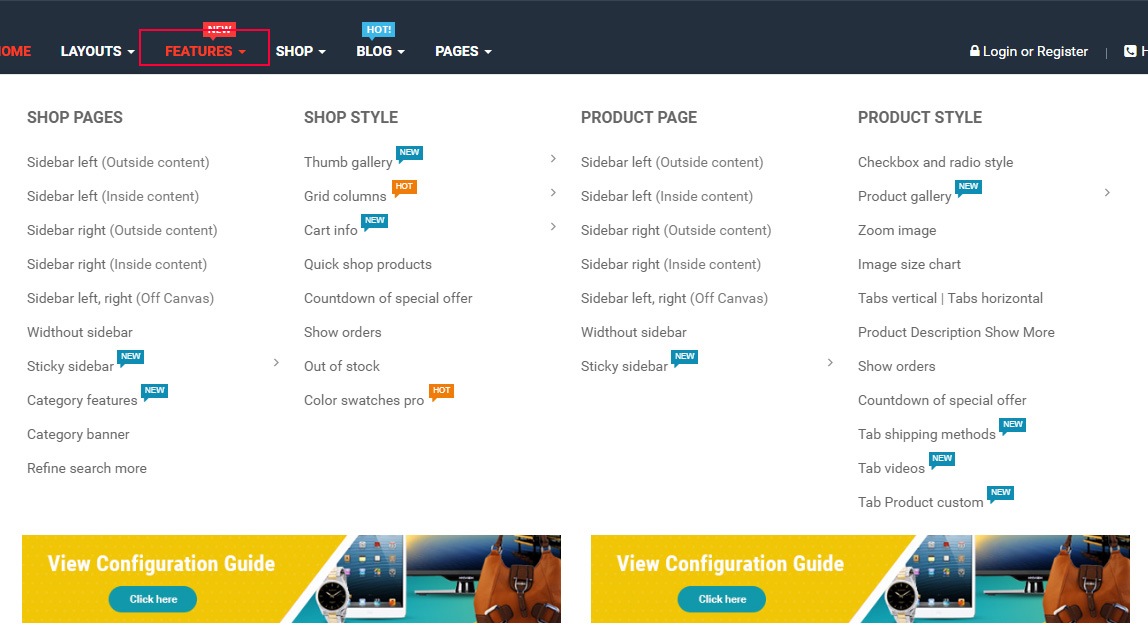
View Frontend: The options on the create Menu features
Product Detail
Go to admin › OpenCartWorks › So Themes Config › Page Tab › Product Category › Product page
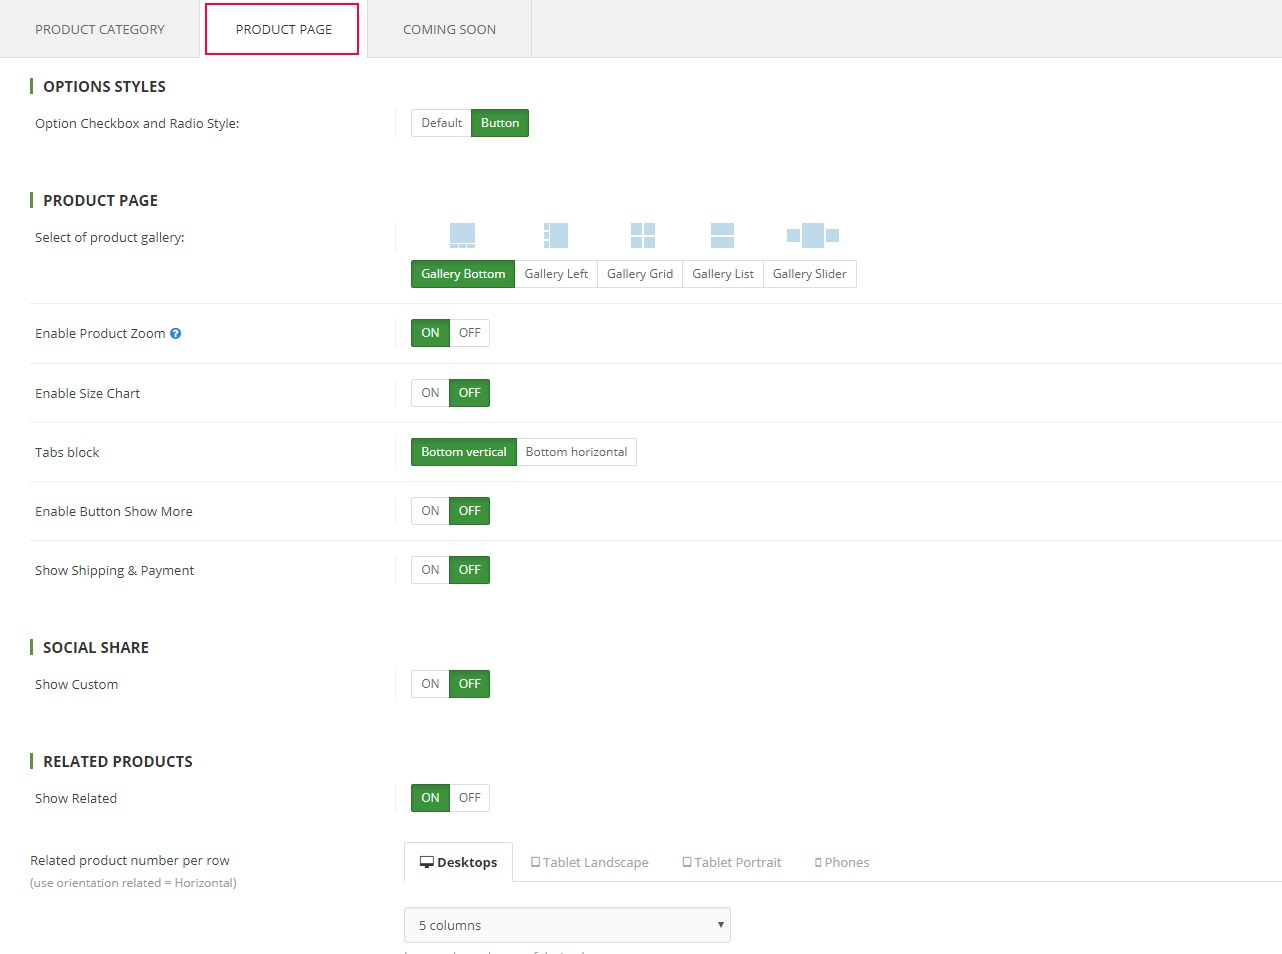
1.Options Styles
Option Checkbox and Radio Style- refreshing the default option is more beautiful
2.Product Page
Product gallery- Select one in option ( Gallery Bottom| Gallery Left| Gallery Grid | Gallery list | Gallery Slider)Enable Product Zoom- Options (yes/no)Enable Size Chart- add product image size chartTabs block- Select one in option(vertical|horizontal)Enable Button Show More- Add button (show more) on product description, click button (show more) show full descriptionShow Shipping & Payment- Add new tabs Shipping & Payment
3.Social Share
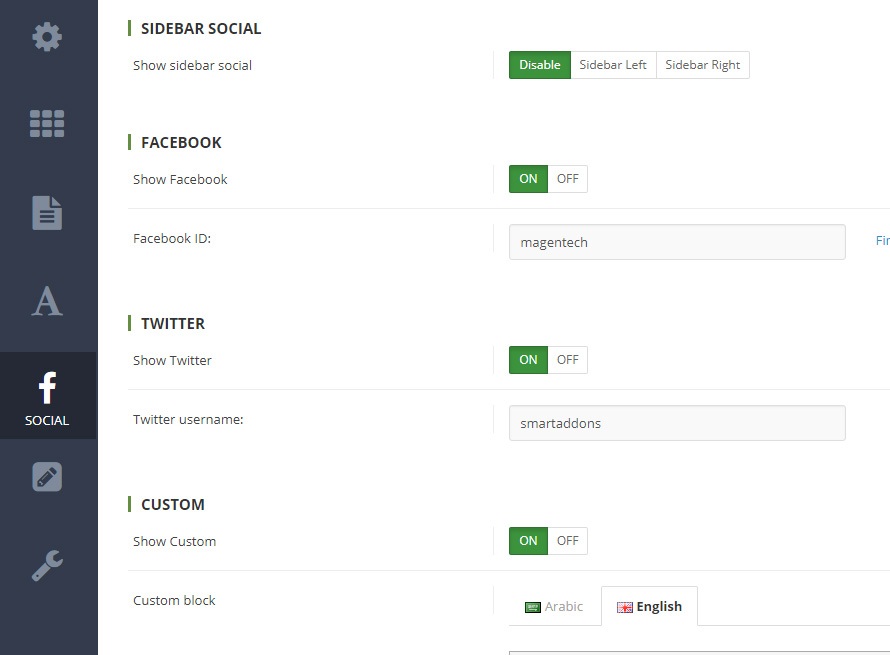
Show Custom- Options (yes/no)Custom Content- Write content to Custom
4.Social Share
Show Related- Options (yes/no)Related product number per row- Column number display related product
View Frontend: The options on the create Menu features

Comming Soon
Go to admin › OpenCartWorks › So Themes Config › Page Tab › Coming Soon
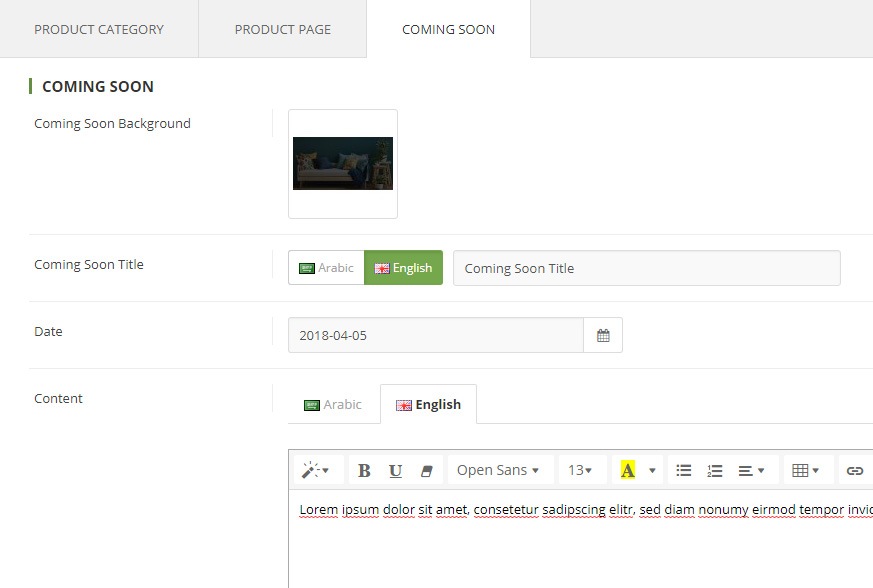
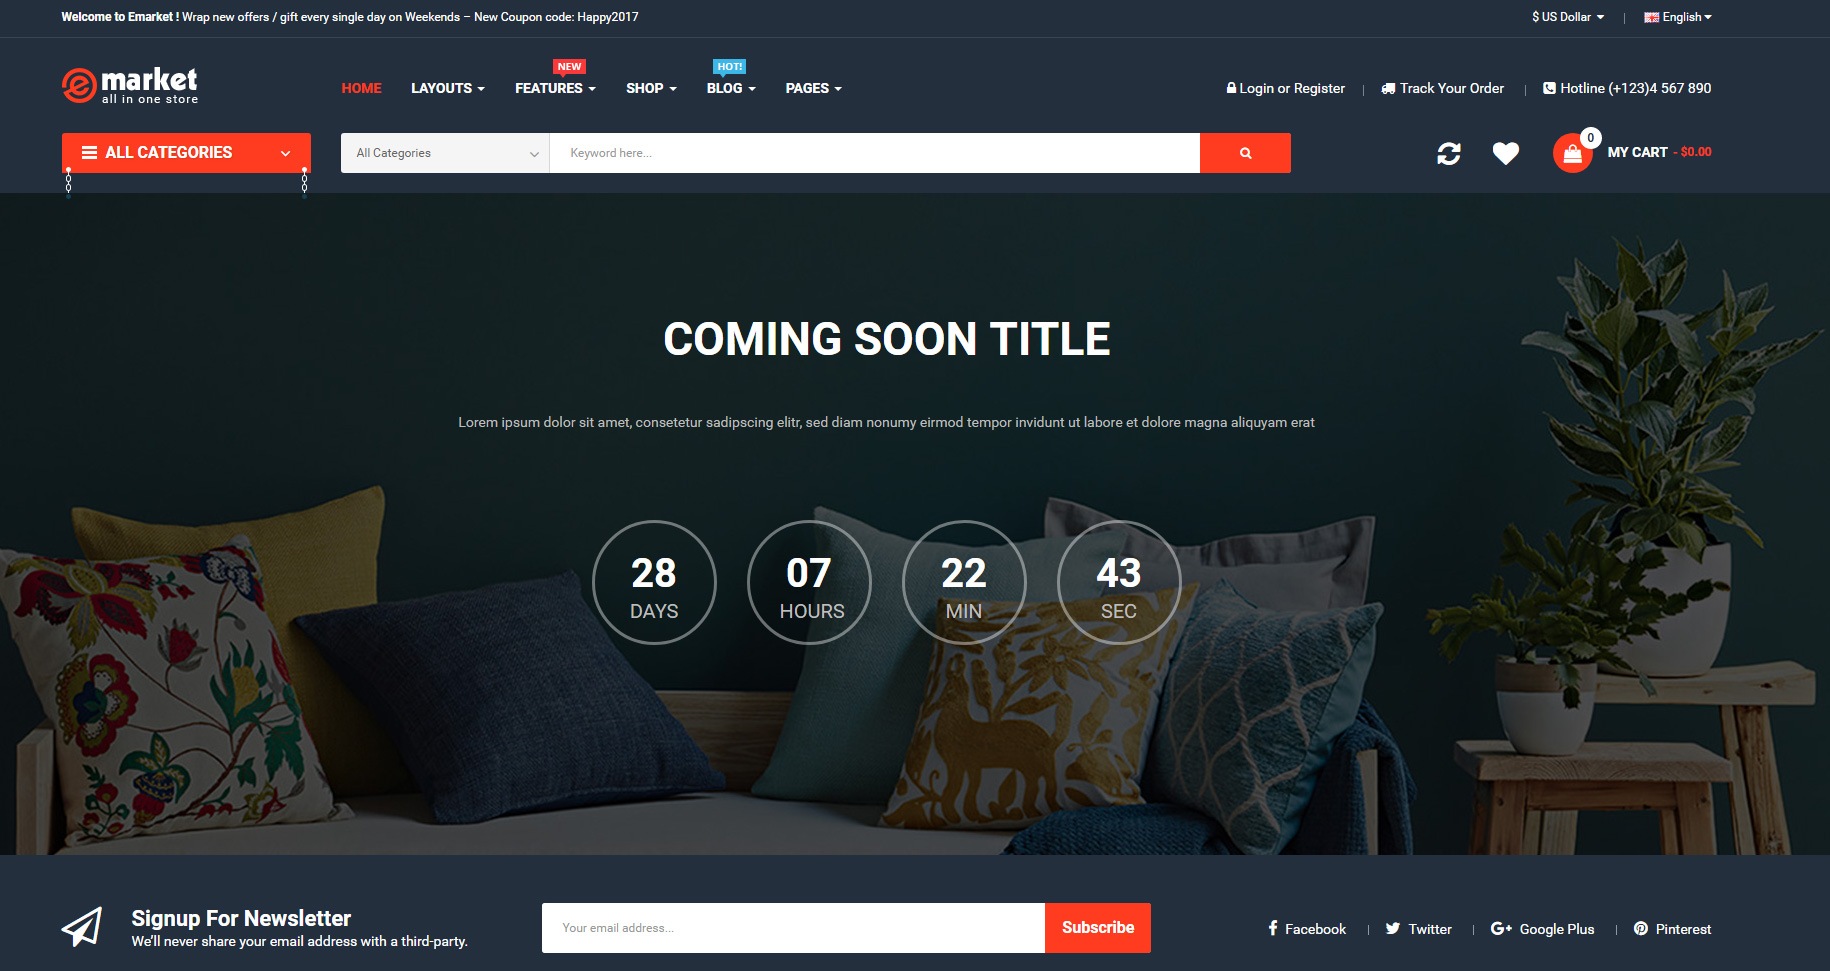
Coming Soon Background- Set background image for Coming SoonComing Soon Title- is the heading of Coming SoonDate- is the dates of coming soonContent- is the content of coming soon
View Frontend:

Font tab
Go to admin › OpenCartWorks › So Themes Config › font Tab
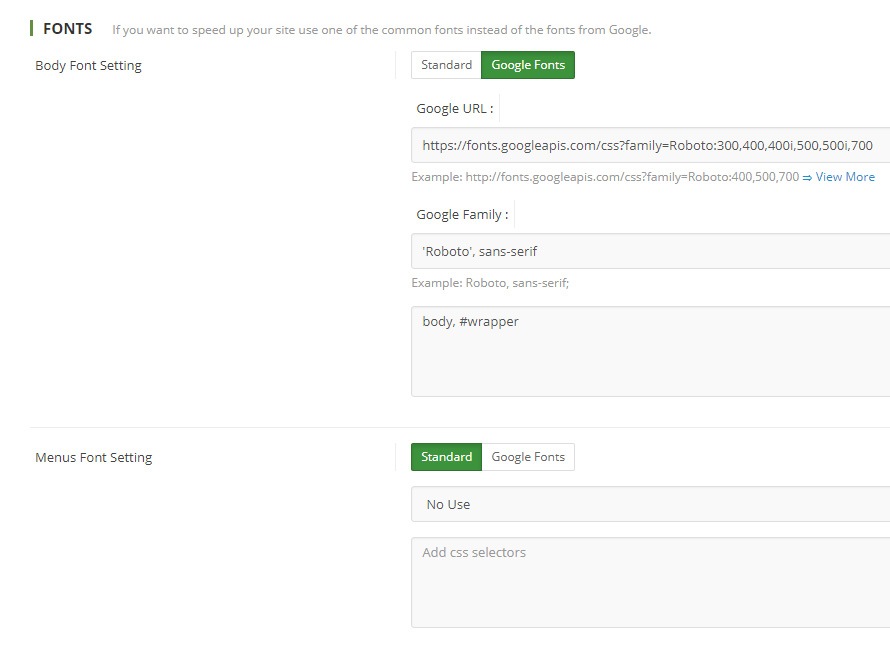
Font Setting standard- It is the default fonts of the systemFont Setting Google Fonts- It is the Google fonts, fast, and open through great typography.Google URL- Example: http://fonts.googleapis.com/css?family=Roboto:400,500,700 ⇒ View MoreGoogle Family- Example: Roboto, sans-serif;Add css selectors- is the css selectors of setting
Custom Tab
Go to admin › OpenCartWorks › So Themes Config › custom Tab
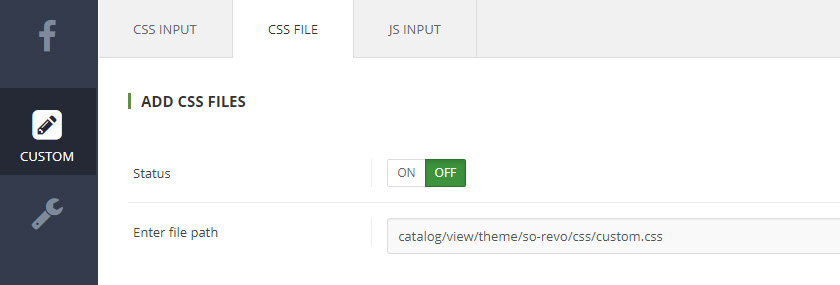
CSS Input- It is the css code directCSS File- add file css, Enter file path file cssJS File- add file js, Enter file path file js
Advanced Tab
Go to admin › OpenCartWorks › So Themes Config › Advanced Tab
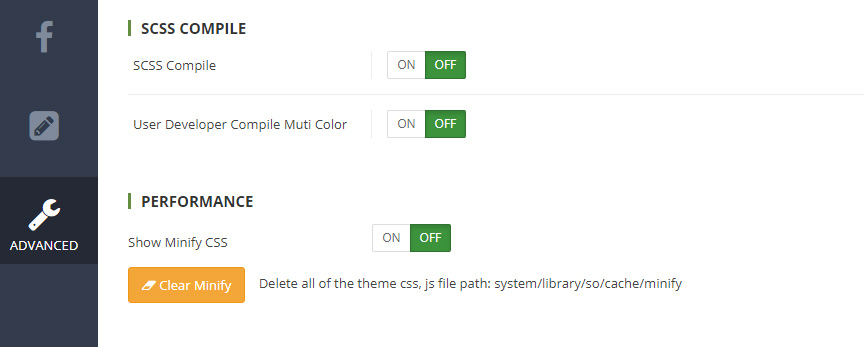
SCSS Compile- Compile scss source for get css styles usingUser Developer Compile Muti Color- Only user developerShow Minify CSS- compress all css to only one fileShow Minify JS- compress all js to only one fileChange the image type jpg , png , gif => webp- by add the code below before at the line 62 of this file catalog\model\tool\image.phpif($extension == 'jpg' || $extension == 'png' || $extension == 'gif' || $extension == 'jpeg') { $dir = DIR_IMAGE; $name = $image_new; $newName = substr($image_new, 0, strrpos($image_new, '.')) . '.webp'; // Create and save if (!is_file(DIR_IMAGE . $newName)) { if ($extension == 'jpeg' || $extension == 'jpg') $img = imagecreatefromjpeg($dir.$name); elseif ($extension == 'gif') $img = imagecreatefromgif($dir.$name); elseif ($extension == 'png') $img = imagecreatefrompng($dir.$name); imagepalettetotruecolor($img); imagealphablending($img, true); imagesavealpha($img, true); imagewebp($img, $dir . $newName, 100); imagedestroy($img); } else { if ($extension == 'jpeg' || $extension == 'jpg') $image_new = $newName; elseif ($extension == 'gif') $image_new = $newName; elseif ($extension == 'png') $image_new = $newName; } }

General Tab
Go to admin › OpenCartWorks › So Mobile › General
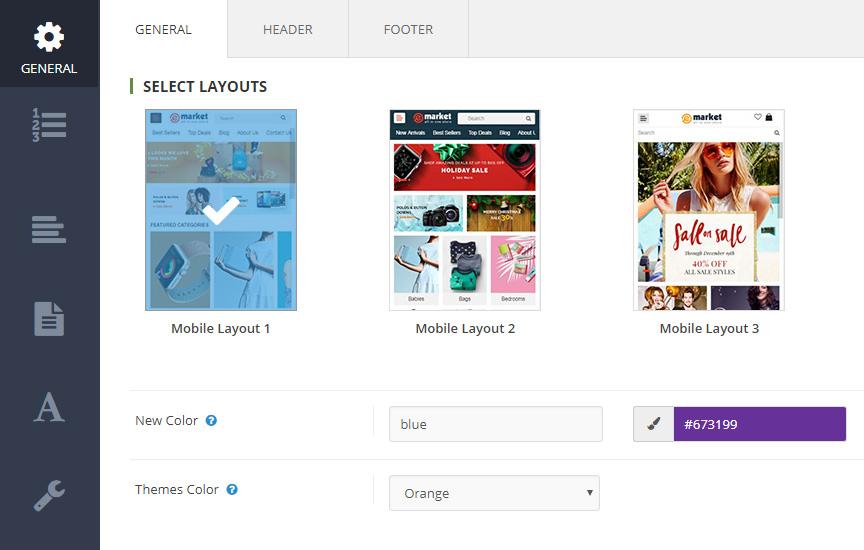
1.Select Layout - Choose the layout that you like. Click button Apply Default Setting Choose the Layout
New Color- Set name color (do not uppercase letters) and fill color. Continue Click button Compile CSS.Select Color- Select the color you just created › Click button Save
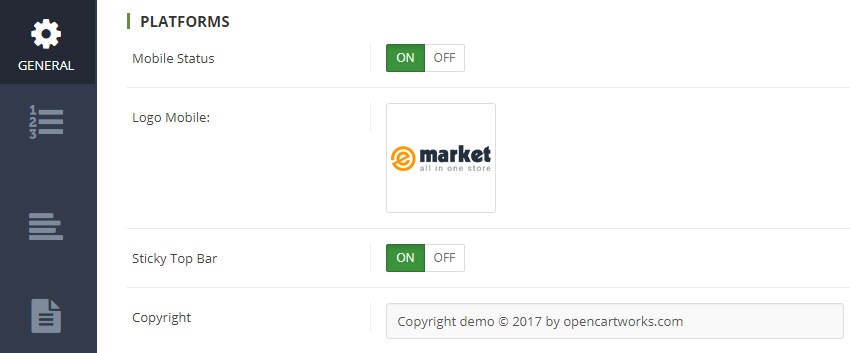
2.Platforms
Mobile StatusOn - use layout mobile/ Off - use layout responsiveLogo Mobile- Choose a image pathSticky Top Bar- Attach sidebar to top the page when the user scrollsCopyright- It is the content to Copyright
Bottom Bar Tab
Go to admin › OpenCartWorks › So Mobile › Bottom Bar
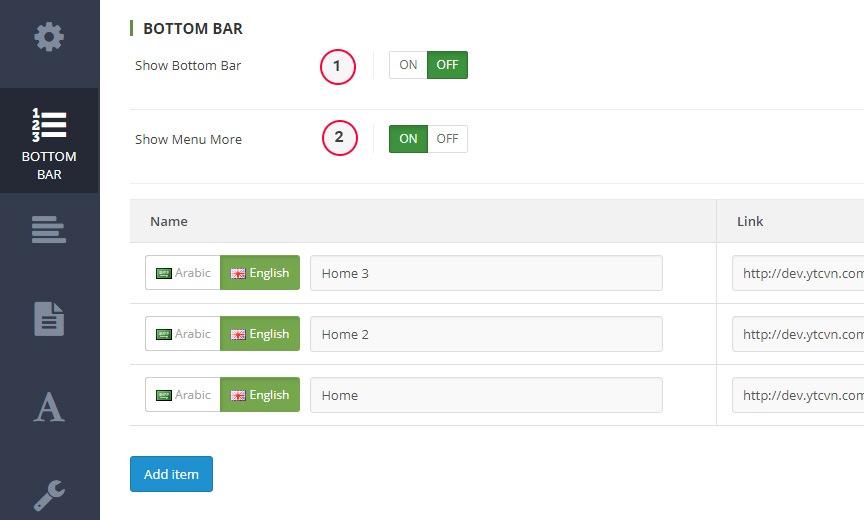
Show Bottom Bar- Options (yes/no)Show Menu More- Options (yes/no)
View Frontend:

Panel Left Tab
Go to admin › OpenCartWorks › So Mobile › Left Bar
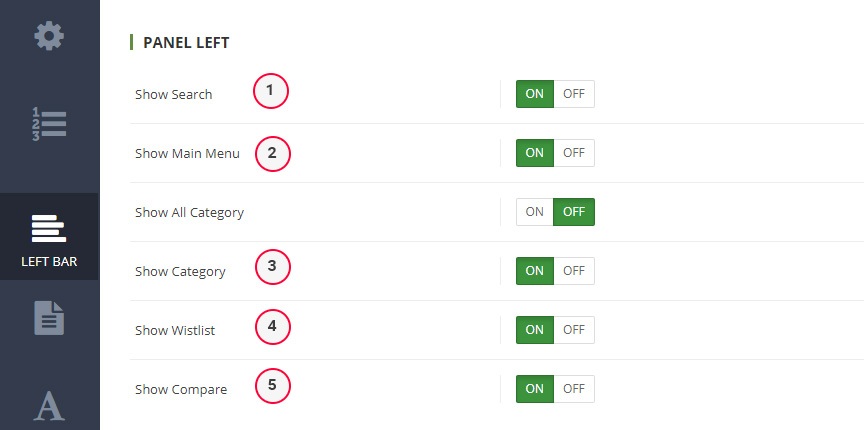
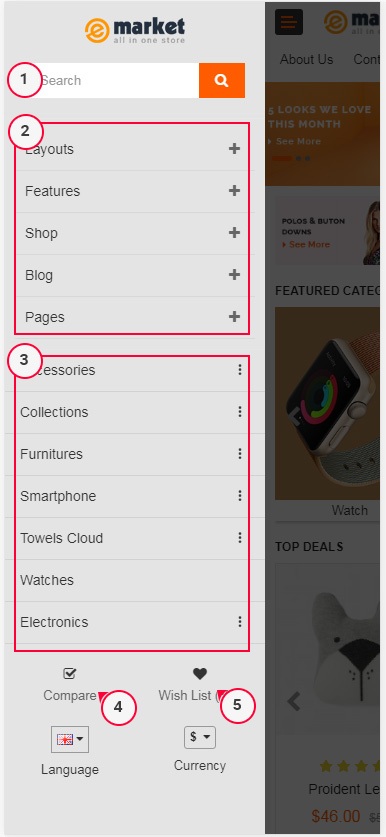
Show Search- Options (yes/no)Show Main Menu- Options (yes/no)Show All Category- Options (yes/no)Show Category- Options (yes/no)Show Wistlist- Options (yes/no)Show Compare- Options (yes/no)
View Frontend:
Category Page Tab
Go to admin › OpenCartWorks › So Mobile › Page
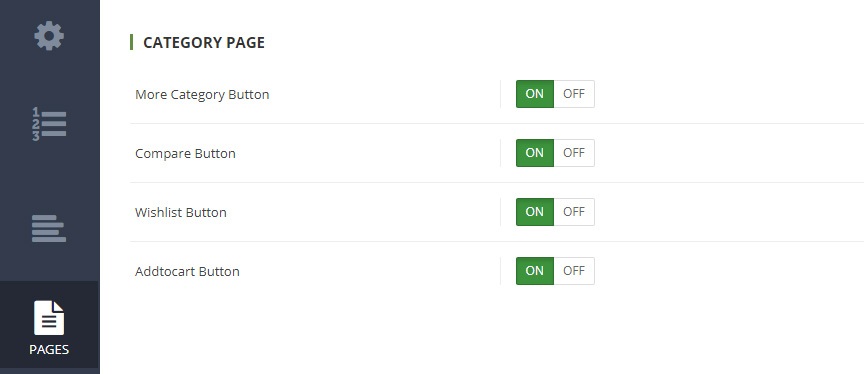
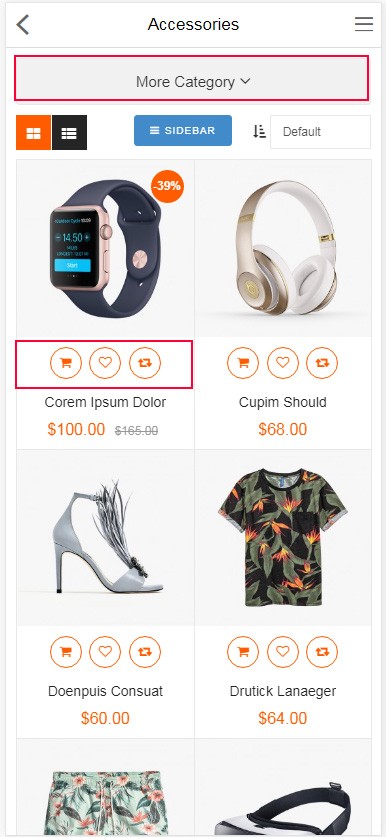
More Category Button- Options (yes/no)Compare Button- Options (yes/no)Wishlist Button- Options (yes/no)Addtocart Button- Options (yes/no)
View Frontend:
Fonts Tab
Go to admin › OpenCartWorks › So Mobile › font Tab

Font Setting standard- It is the default fonts of the systemFont Setting Google Fonts- It is the Google fonts, fast, and open through great typography.Google URL- Example: http://fonts.googleapis.com/css?family=Roboto:400,500,700 ⇒ View MoreGoogle Family- Example: Roboto, sans-serif;Add css selectors- is the css selectors of setting
Advanced Tab
Go to admin › OpenCartWorks › So Mobile › Advanced
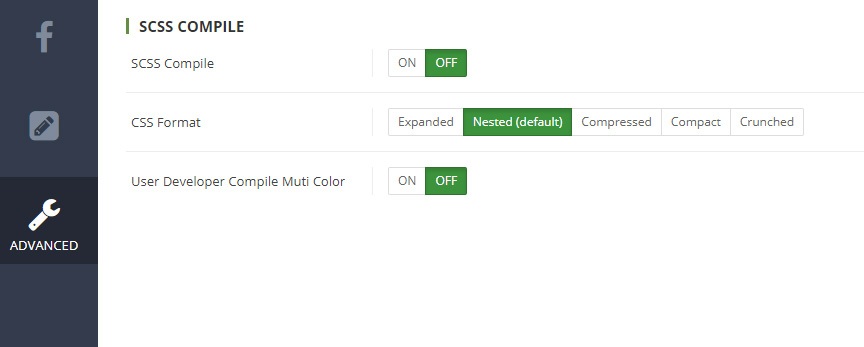
SCSS Compile- Compile scss source for get css styles usingUser Developer Compile Muti Color- Only user developer
Extension Configuration
There are two ways to configure Extensions of this Theme:
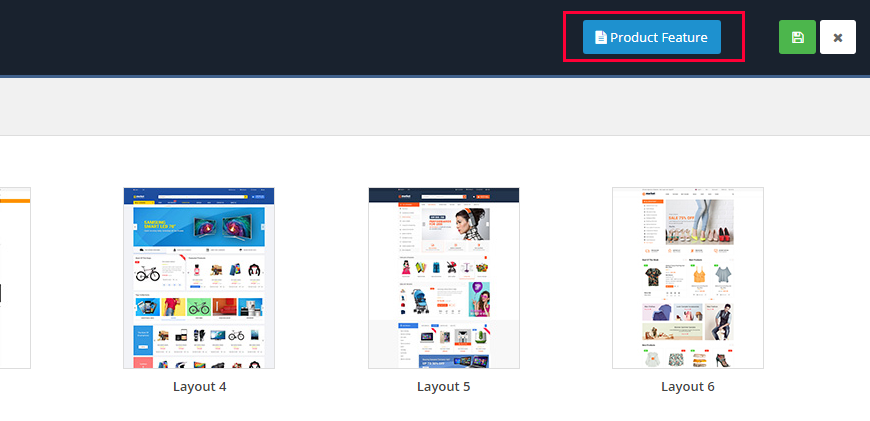
Option 1: Go to Admin Control Panel => OpenCartWorks => So Page Builder => Select the Layout you want.
Themes is using extensions:
- So Page Builder: Click here to read user guide
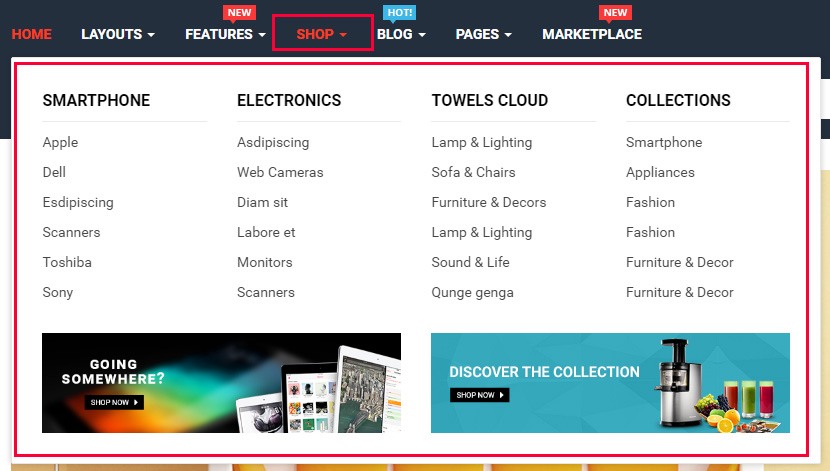
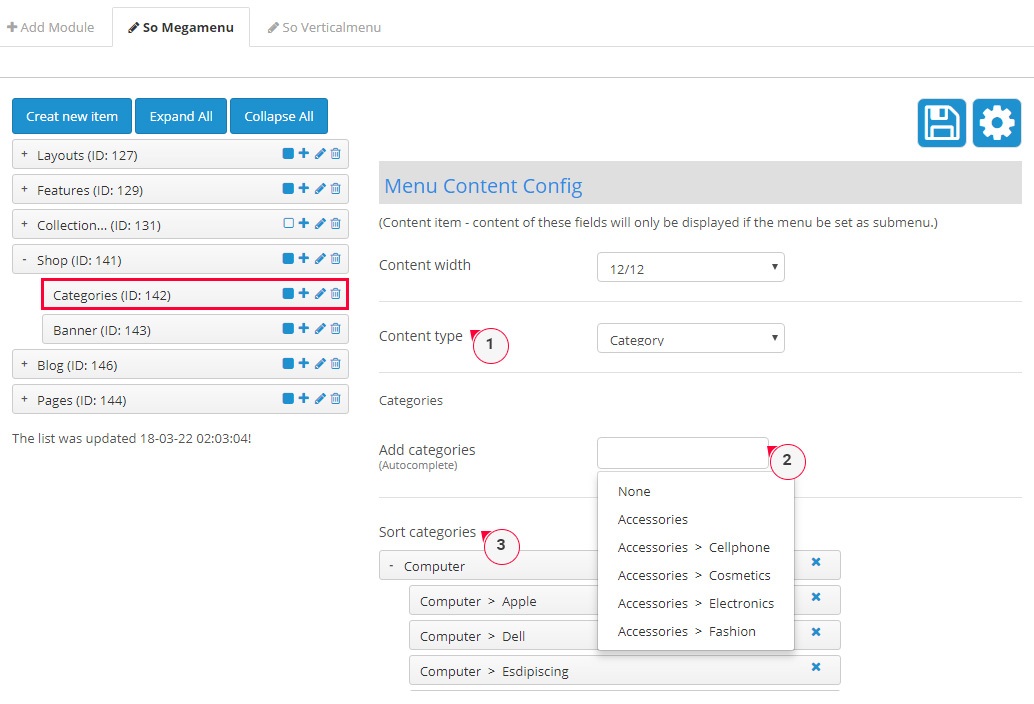
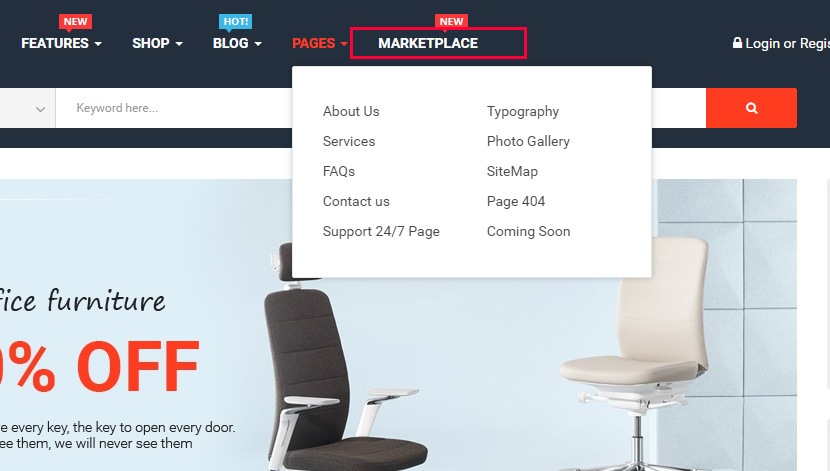
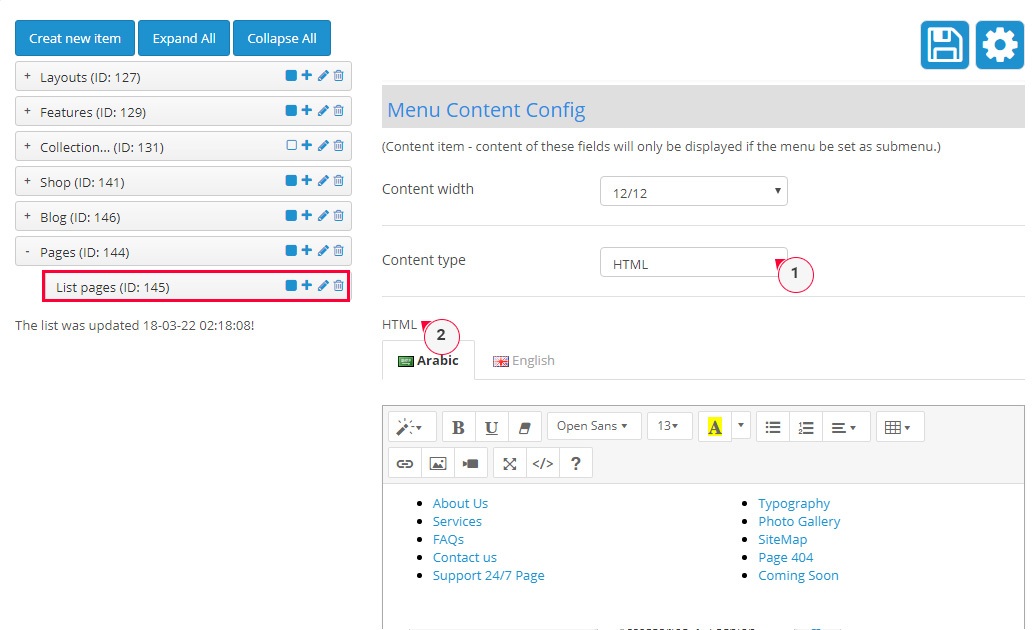
- So Mega Menu: Click here to read user guide
- So Onepage Checkout: Click here to read user guide
- So Search Pro: Click here to read user guide
- So Home Slider: Click here to read user guide
- So Category Slider: Click here to read user guide
- So Listing Tabs: Click here to read user guide
- So Extra Slider: Click here to read user guide
- So Deals: Click here to read user guide
- So Filter Shop By: Click here to read user guide
- So Latest Blog: Click here to read user guide
- So Newsletter Custom Popup: Click here to read user guide
- So Social Login: Click here to read user guide
- So Instagram Gallery: Click here to read user guide
- So Quickview: Click here to read user guide
Option 2: Go to Admin Control Panel › Extensions › Extensions › Choose the extension type: Modules => And choose the module you want.
Page Builder Configuration
Go to Admin Control Panel => OpenCartWorks => So Page Builder => Select the Layout you want.
Note
Home 1 is made from So Page Builder (Home 1 + Footer 1), similar as other Home page
1.Example So Page Builder : Edit Home 1
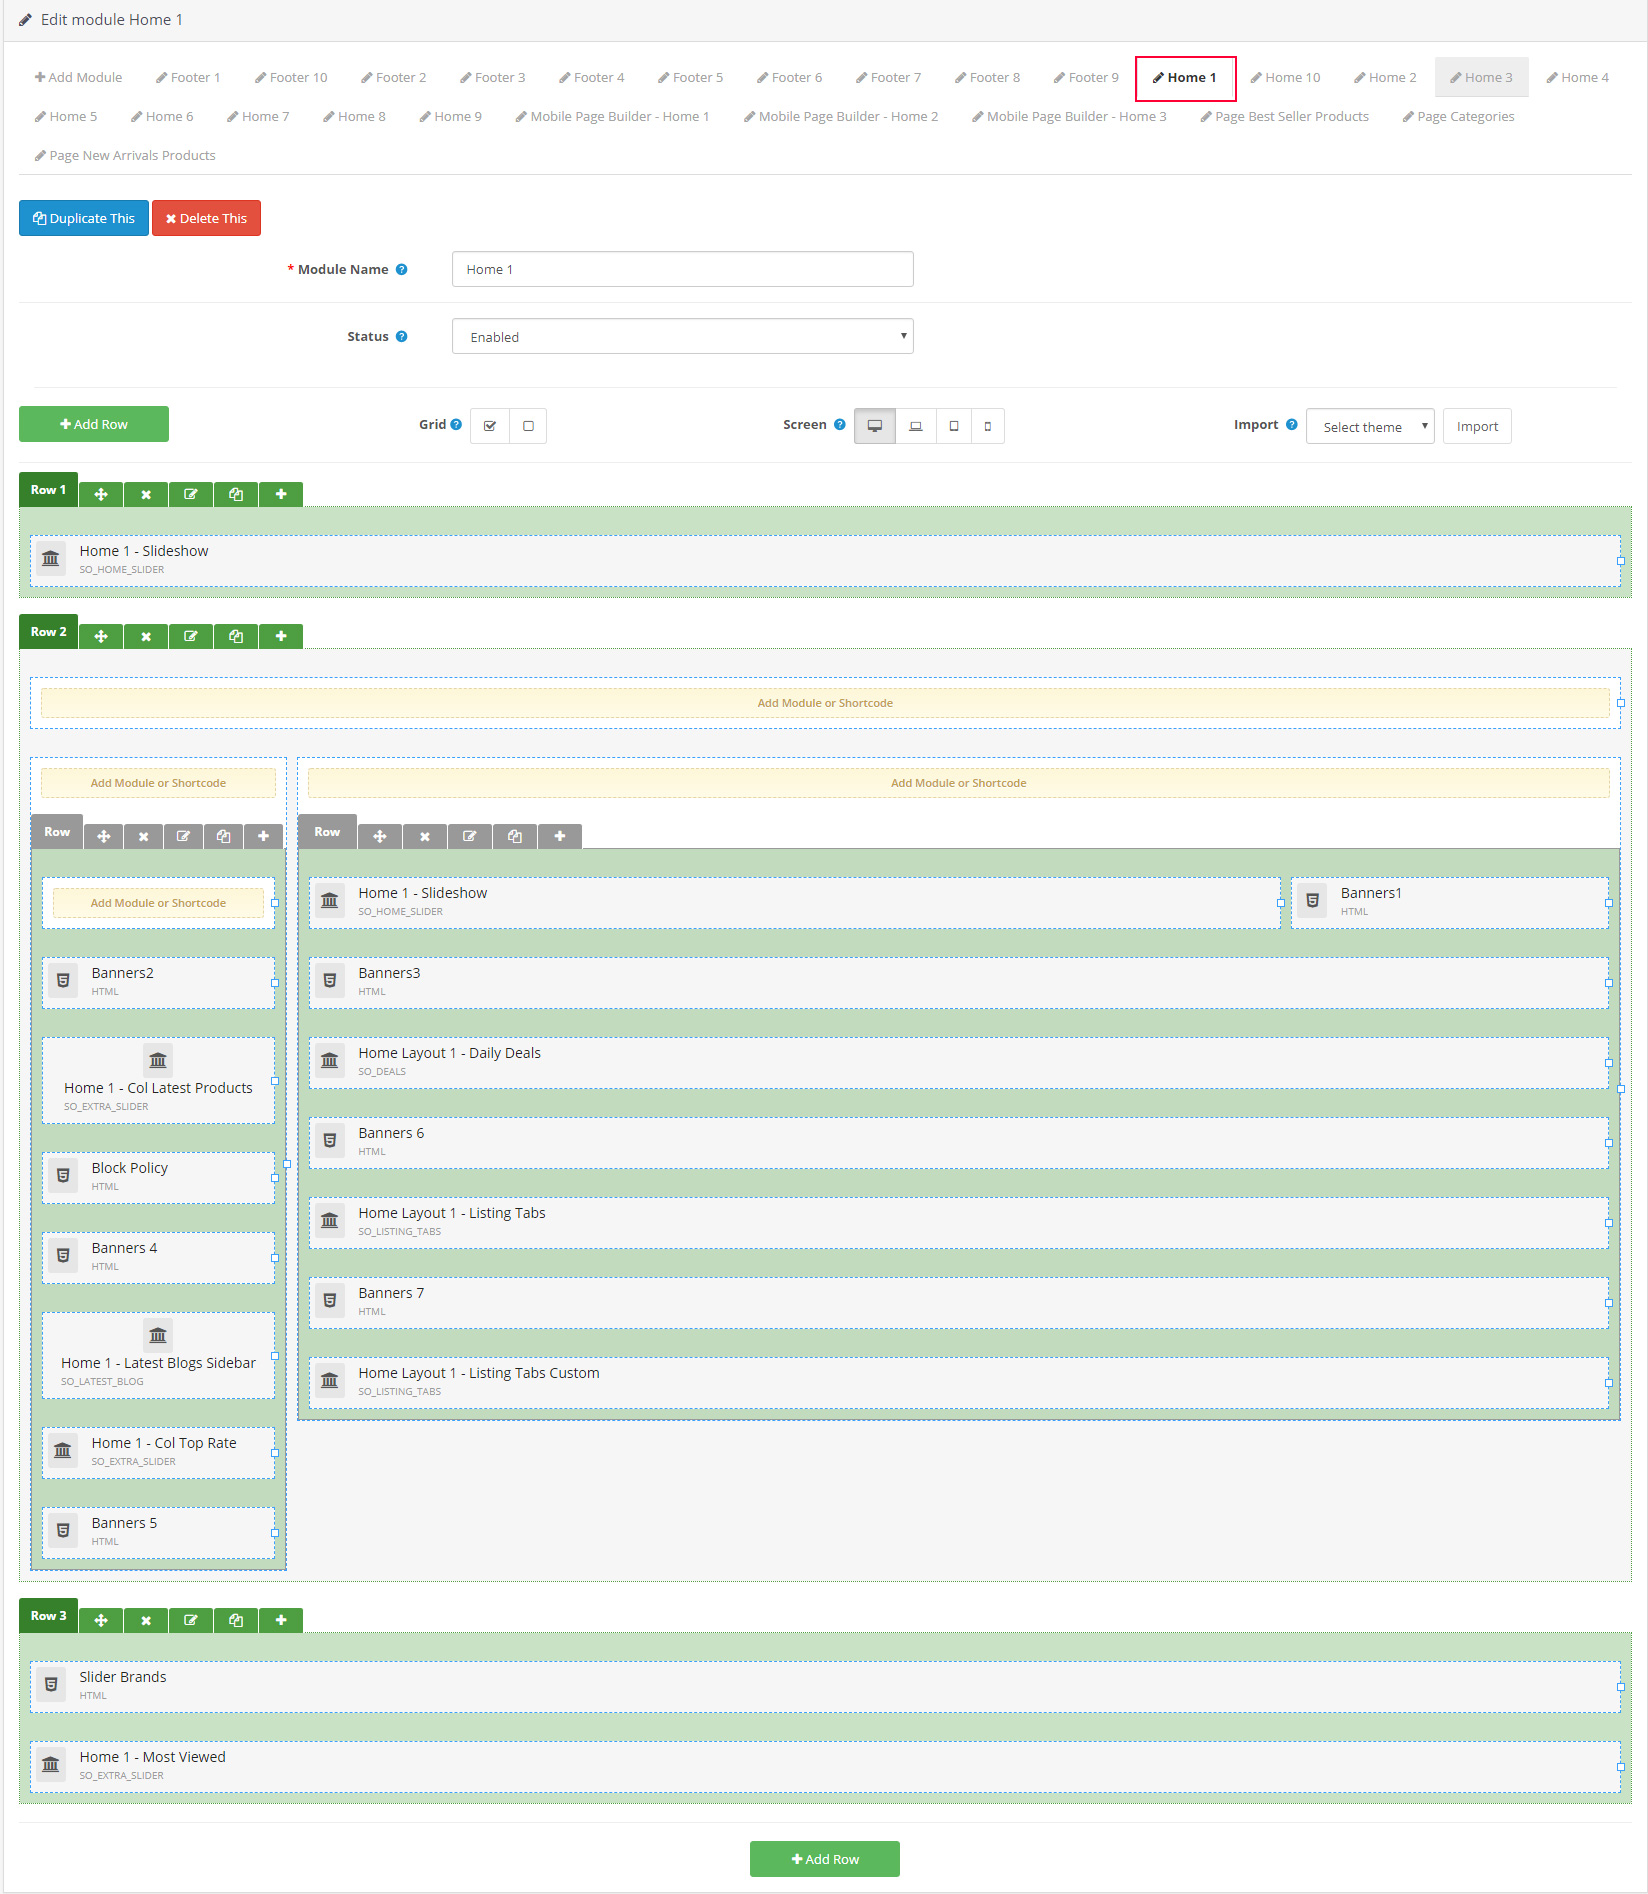
It will list all modules in the home page 1, You want to edit the module then click edit it
2.Example So Page Builder : Edit Footer 1
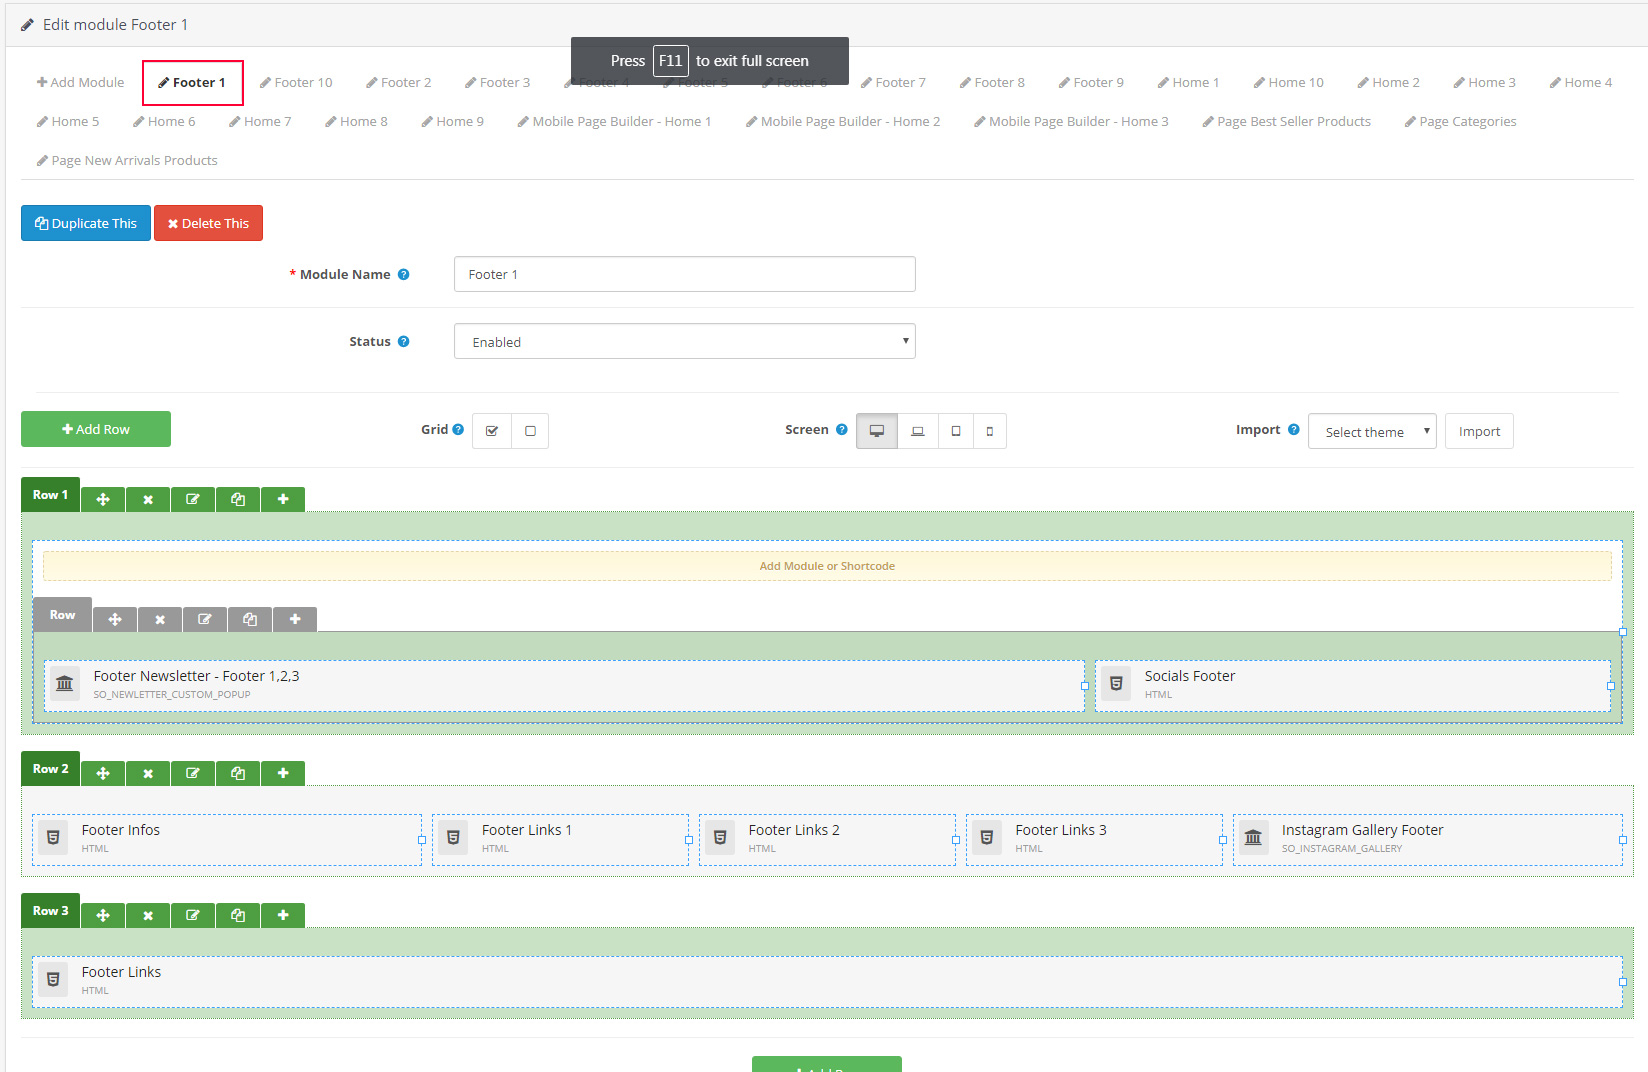
It will list all modules in the Footer 1, You want to edit the module then click edit it
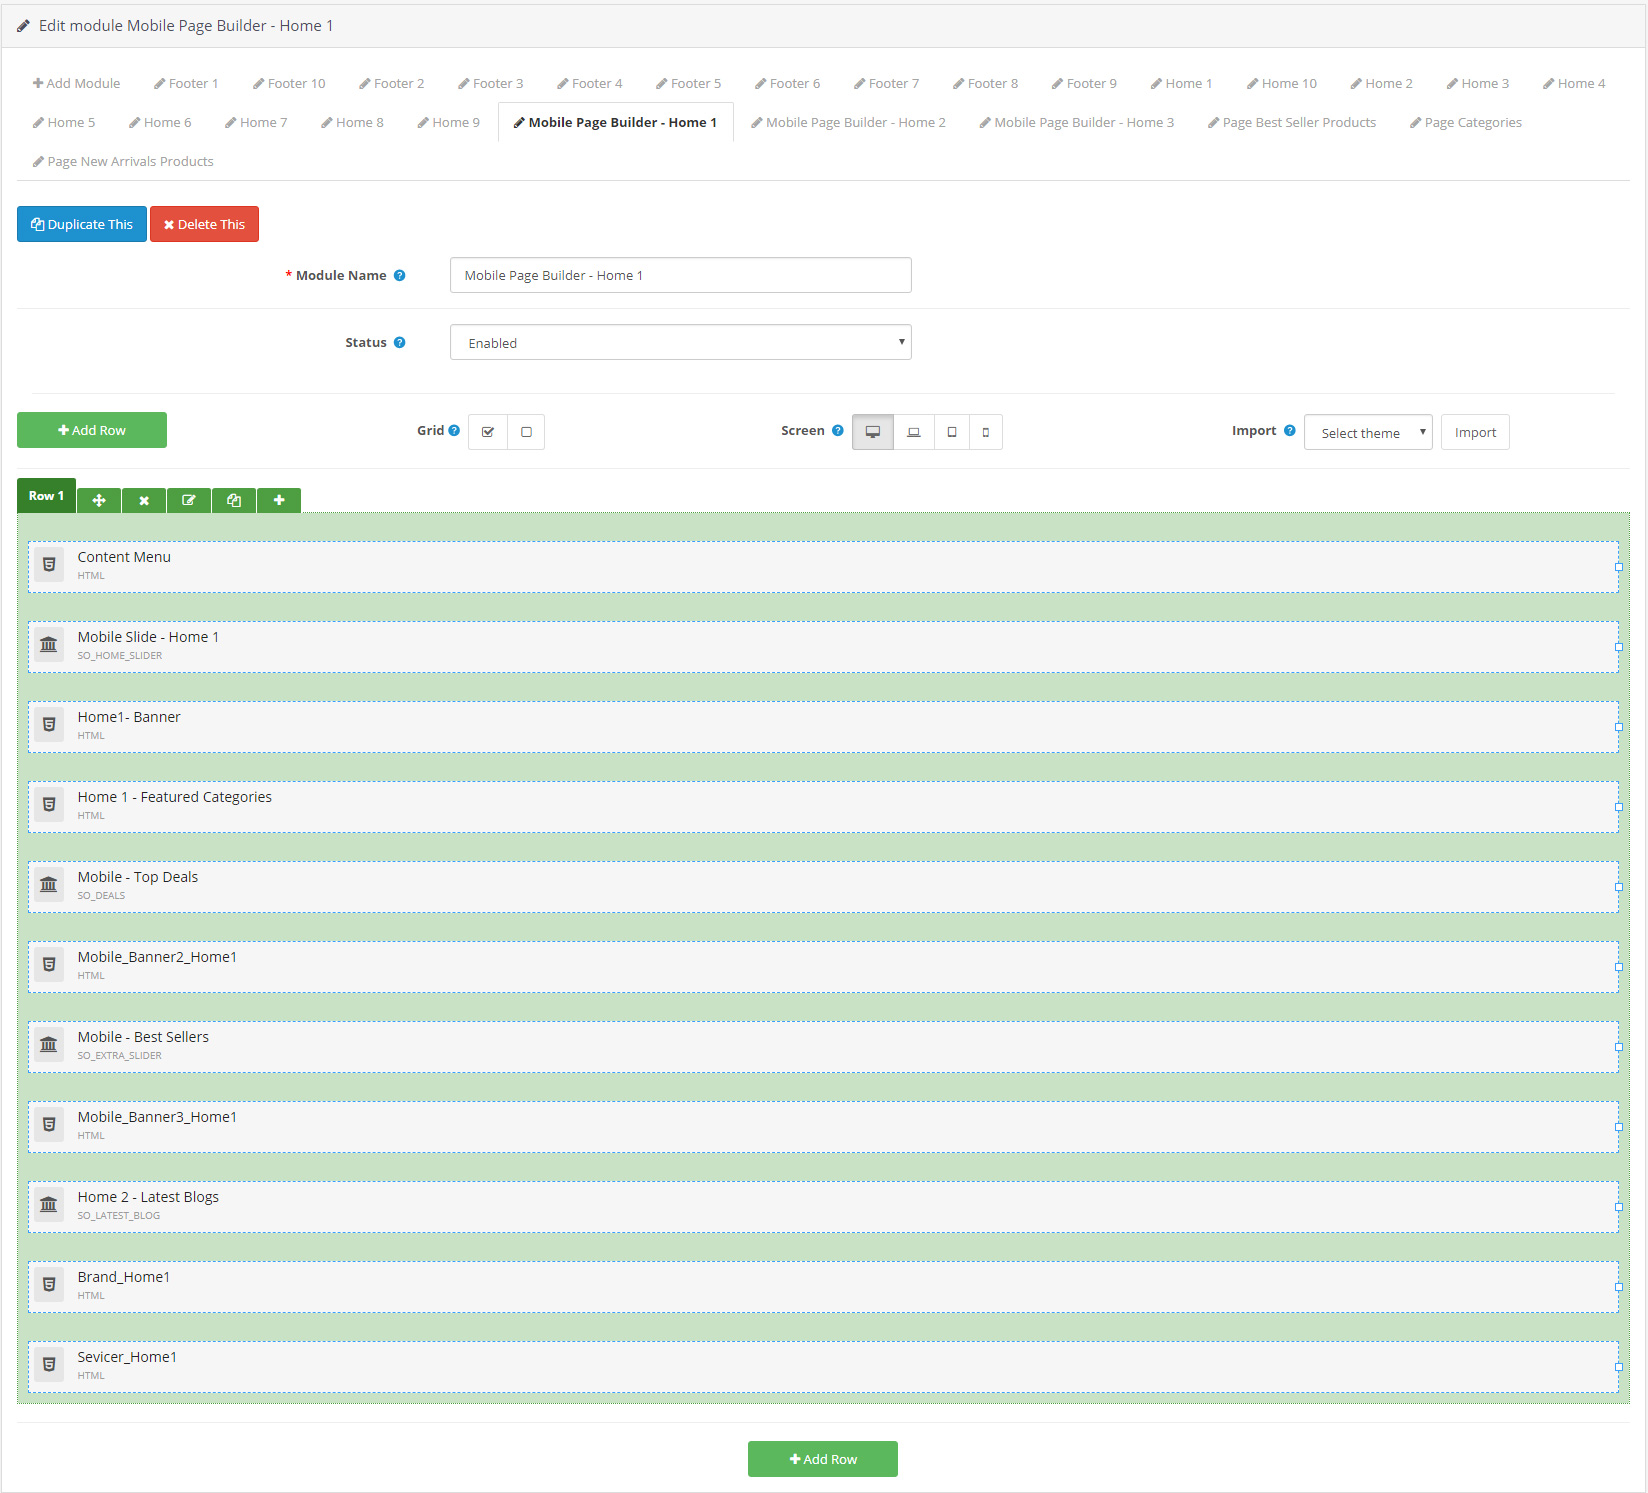
3.Example So Page Builder : Edit Mobile Page Builder - Home 1
Help & Support
If you have any question that is beyond the scope of this help file, please send us via: Submit a Ticket
Our working hours: Monday to Friday 8AM - 5PM GMT+8.
Thank you so much for purchasing this theme!
What do we support and do not support?
We Do Support:
- Provide detailed documentation to help you install and configure the theme successfully by yourself.
- Answer your enquiries about theme configuration and use.
- Answer you how to edit and translate the language files.
- Fix bugs of our themes ONLY if the source code are not modified.
We Do Not Support:
- Upgrading the theme on your store if the source code was modified by any reasons.
- Editing the theme's source code for your own requirements which the theme's current version is not supported. Except editing language files.
Note
Note: We have right to answer or not answer you how to edit the theme's source code.
