So Luca for OpenCart 3
So Luca with multi-homepages will bring an awesome experience for any customer on OpenCart 3. It not only includes many powerful features, but also support multi- vendor plugin.
System Requirements
System Requirements: here
Install Default OpenCart
You can click here to read user guide to install default OpenCart.
Install Theme
You can click VIDEO TUTORIAL to view user guide to install Theme.
There are two ways to install a SO Theme:
- Install Quickstart: By using this package, you will set the template exactly as our Demo with sample data.
- Install Template : If you exist a opencart website you can install only template.
1 Install with Quickstart Package:
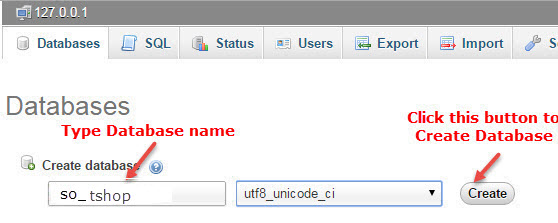
1.1 - Create new database
Step 1: Open your Browser and type : localhost/phpmyadmin or yourdomain/phpmyadmin
Step 2: Then create database

1.2 - Extract and Upload the whole quickstart package (admin, catalog, image … in tt_cygnus_quickstart folder ) to your server
1.3 - Open browser and navigate to your site (where the quickstart uploaded) to load default Opencart installer with the database you just created.
As an example, name of opencart is SO-Luca: Https://Opencart/SO-Luca/upload/install/index.php then click "install" button1.4 - Enter the username and password for the administration

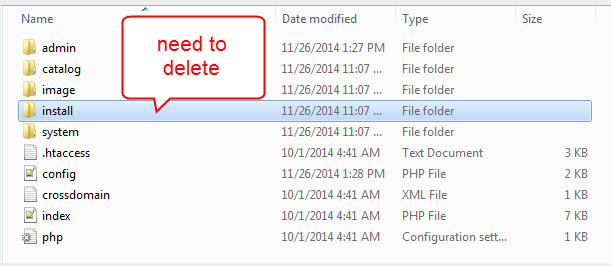
1.5 - Installation Complete

You need to delete install folder

2 Install Theme
Step 1: Go to Extensions => Installer => Click Upload and select the “so3_luca_template_oc3.0.0_v1.0.0.ocmod” file to upload. Then you will see the message Success: You have installed your extension!

Note: If you get this error: file could not be uploaded, you can do these steps
Step 1: Make sure your PHP value requirements look like:
max_execution_time=3000
max_input_vars = 25000
post_max_size=350M
upload_max_filesize=200M
Step 2: Or you can try install the theme via FTP/Cpanel:
1. Please upload the theme package to your root file
2. Use cpanel account to unzip it
3. Move all folders into ‘upload’ folder to Root folder
4. Go to Admin >> Extensions >> Extensions >> filter Modules >> Click install Theme control panel module
5. After that, go to Admin >> Extensions >> Modifications >> click Refresh button
6. Try go to Admin >> Systems>> Users >> User groups >> Edit administrator >> click Select All >> Save
Step 2: Go to Extensions => Extensions => Click Install button

Step 3: Go to System => User => User-Group => Click Edit button => Then you click Select All button

Step 4: Go to Extensions => Modifications => Click Refresh button to run "ocmod.xml" file

Step 5: Go to Extensions => Theme Control Panel and edit your store: General Tab, Layout Tab, Page Tab...

Step 6: Refresh your site and you got it
Install Purpletree Multivendor
Step 1: Install this theme
Step 2: Download Multivendor module from here .Install/configure it following their guide.
Step 3: Please configure the multivendor to run
Step 4: Extract the file so_emarket_purpletree_multivendor.zip
Step 5: Upload 'catalog' folder from so_emarket_purpletree_multivendor to Root site folder to override the 'catalog' folder.
Step 6:Go to Admin => Extensions => Modification => Click button New, copy code from ocmod/Purpletree - Override.ocmod.xml to editor:
Step 7: In the Modification list, please find "Purpletree Multivendor for OpenCart 3.x" => click Edit button => Click "Save" button
Step 8: Go to Admin => Extensions => Modification and click on the Blue Refresh button to apply changes..
Select Layout
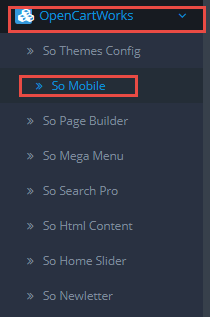
Go to OpenCartWorks => So Themes Config => General Tab => Choose the Layout you want
General: GeneralCreate Color Theme Control
Please watch VIDEO TUTORIAL to configure
Install Language and Override Language
1. Install Laguage
You can read more information: Here
2. Override Language
Step 1: Extracting
Extract the language archive file which you downloaded into your PC: patch_language_v3.x
Step 2: Renaming
You need to change folders:
   - patch_language_v3.x\admin\language\%locale%
   - patch_language_v3.x\catalog\language\%locale%


   and files:


   - patch_language_v3.x\admin\language\%locale%\%locale%.php
   - patch_language_v3.x\catalog\language\%locale%\%locale%.php
To your language: replace "%locale%" with the name of the language (English, German...).
Step 3: Uploading
Upload admin and catalog folders you replaced into your OpenCart folder

Step 4: Translating
Then please go to catalog => language => your language folder => extension => select files you want to translate
Theme Configuration
Go to Extensions => Modules => Theme Control Panel => Click Edit button. All of parameters of this theme are divided into the following groups, in which they are explained themselves:

Screenshot Backend Settings
General: General/ Header/ Footer/ Banner Effect
Layout: Layout
Pages: Product Listings/ Product Page
Fonts: Fonts
Social Widgets Accounts: Social Widgets Accounts
Advanced: Advanced
Layout Mobile Configuration
Extension Configuration
There are two ways to configure Extensions of this Theme:
Option 1: Go to Admin Control Panel => Extensions => Extensions => Choose the extension type: Modules => And choose the module you want.
So Luca is using extensions:
- So Mega Menu: Click here to read user guide
- So Search Pro: Click here to read user guide
- So Home Slider: Click here to read user guide
- So Category Slider: Click here to read user guide
- So Color Swatches Pro: Click here to read user guide
- So Listing Tabs: Click here to read user guide
- So Extra Slider: Click here to read user guide
- So Deals: Click here to read user guide
- So Filter Shop By: Click here to read user guide
- So Latest Blog: Click here to read user guide
- So Newsletter Custom Popup: Click here to read user guide
- So Page Builder: Click here to read user guide
- So Social Login: Click here to read user guide
Option 2: Go to Admin Control Panel => OpenCartWorks => So Page Builder => Select the Layout you want.
1. Layout 1.
Position of Layout 1: here
To configure Layout 1, please go to Admin Control Panel => Magentech => So Page Builder => Select "Layout 1" and click Edit button
Screenshot Backend Settings: here
2. Layout 2.
Position of Layout 2: here
To configure Layout 2, please go to Admin Control Panel => Magentech => So Page Builder => Select "Layout 2" and click Edit button
Screenshot Backend Settings: here
3. Layout 3.
Support
If you have any question that is beyond the scope of this help file, please send us via: Submit a Ticket
Thank you so much for purchasing this theme!


