So Ladaz Documentation
So Ladaz is available free for fans of OpenCart platform. It is not only easy in configuration, but also simple in interacting to customer more than ever. It has no limited in color, you completely select any favorite color as a special skin for your website, simple, luxury that will benefit your customers to gain a pleasant and easy experience. Furthermore, the theme comes with all needed eCommerce features for building a professional online store such as: daily deals, quick view, mega menu, wishlist, Add to cart, product comparison…
System Requirements
System Requirements: here
Install Default OpenCart
You can click here to read user guide to install default OpenCart.
Install Theme
Feel free to check the detailed VIDEO TUTORIAL
There are 2 ways to install this theme:
Option 1: You can try install via FTP by following these steps:
Step1: Upload theme package to your Root folder (Example: upload the file so_ladaz_template_oc2302_v1.0.0.ocmod.zip)
Step2: Use Cpanel to unzip this file
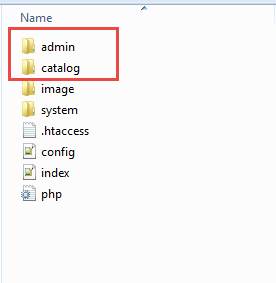
Step3: move all folders into 'upload' folder to Root folder
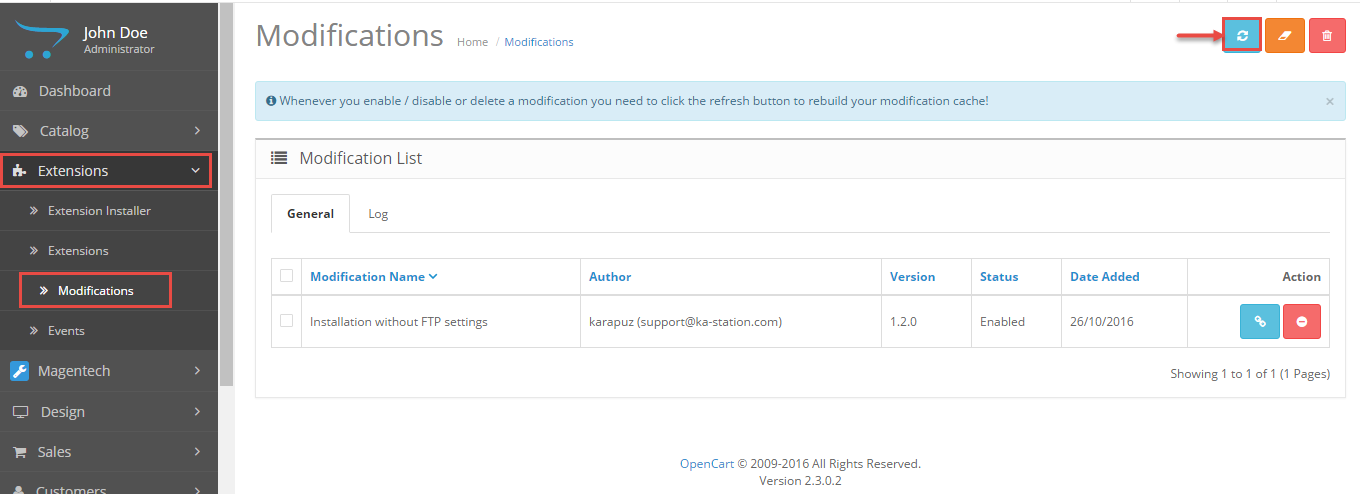
Step 4: Go to Admin => Extensions => Modification => Click Refresh button
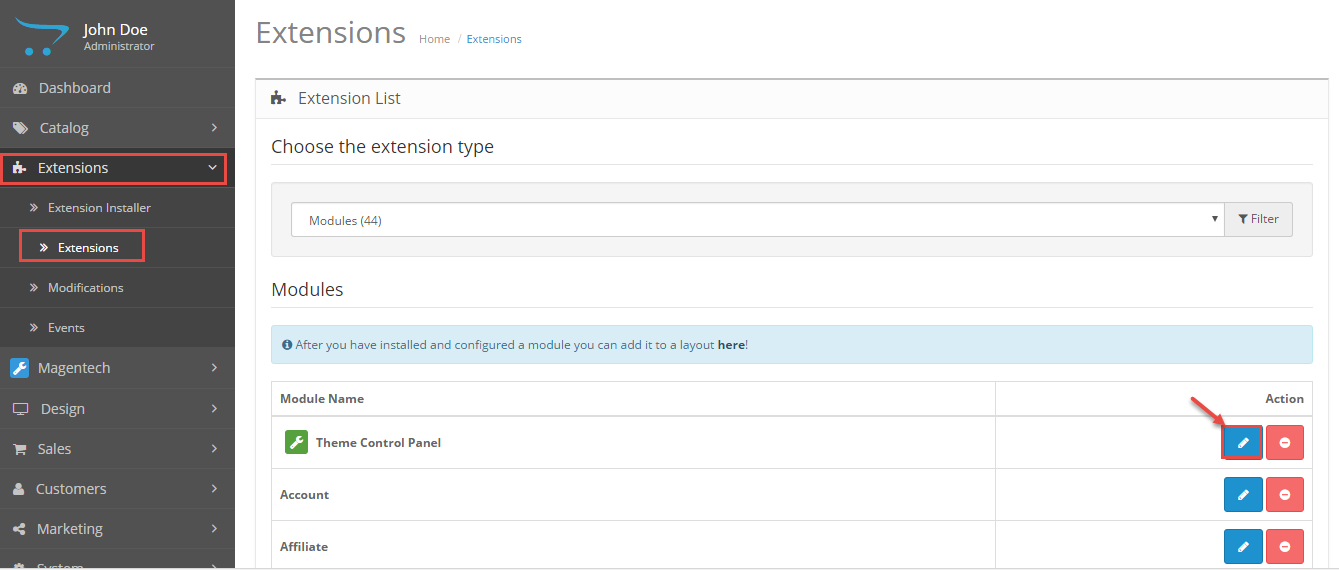
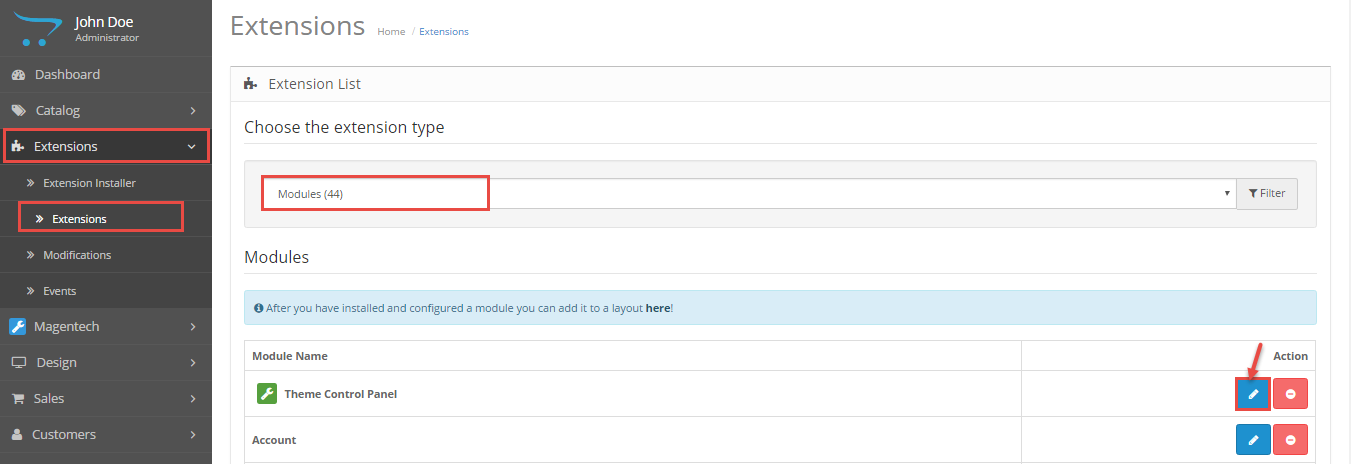
Step 5: Go to Admin => Extensions => Extensions => Filter: Modules => Click to install Theme control panel module
Step 6: Go to Admin => Systems => Users => User groups => Edit Administrator => Select All in all permissions => Save
Option 2: You can Install No FTP for Extension Installer by following these steps::
Step 1 : Install No FTP for Extension Installer extension: Please click http://www.opencartworks.com/ocmod/no_ftp.ocmod.zip to download this extension and extract this file. This extension allows to upload other extensions without using FTP
Step 2: Go to Extensions => Extension Installer => Click Upload and select the “no_ftp.ocmod.XML” file to upload. Then you will see the message Success: You have installed your extension!
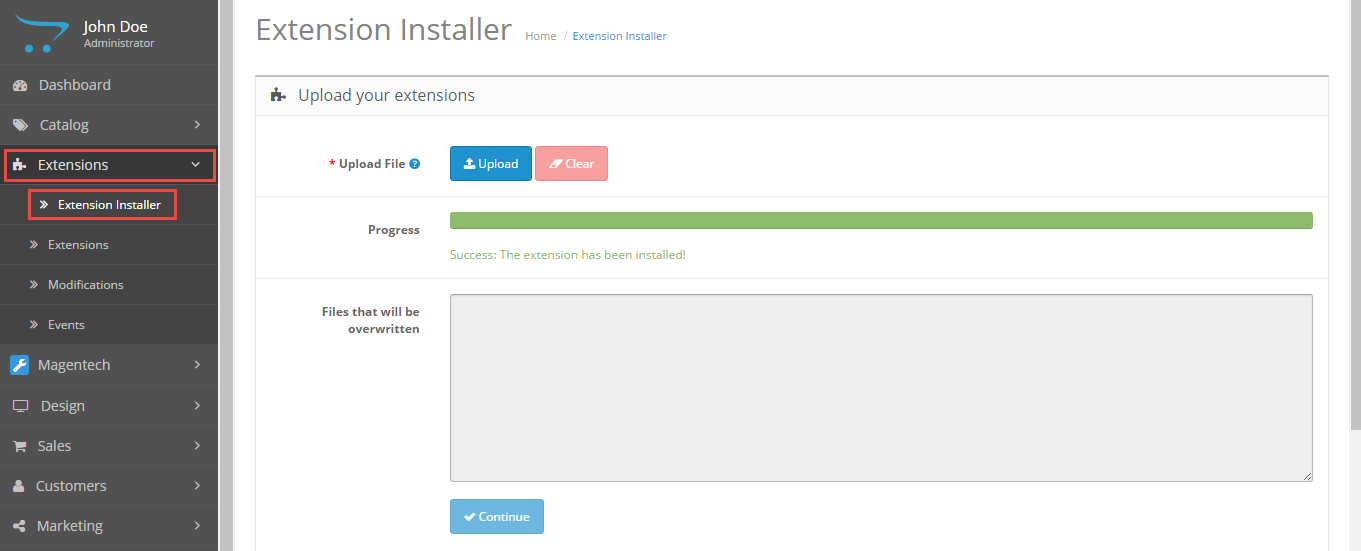
Step 3: Go to Extensions => Extension Installer => Click Upload and select the “so_ladaz_template_oc2302_v1.0.0.ocmod.zip” file to upload. Then you will see the message Success: You have installed your extension!

Step 4: Go to System => User => User-Group => Click Edit button => Then you click Select All button

Step 5: Go to Extensions => Modifications => Click Refresh button
Step 6: Go to Extensions => Theme Control Panel and edit your store: General Tab, Layout Tab, Page Tab...
Step 7: Refresh your site and you got it
Create Color Theme Control
Please watch VIDEO TUTORIAL to configure
Install Language and Override Language
1. Install Laguage
You can read more information: Here
2. Override Language
Step 1: Extracting
Extract the language archive file which you downloaded into your PC: patch_language_v2.3.x
Step 2: Renaming
You need to change folder name & file name:
   - patch_language_v.2.3.x\admin\language\%locale%
   - patch_language_v.2.3.x\catalog\language\%locale%


   and files:


   - patch_language_v.2.3.x\admin\language\%locale%\%locale%.php
   - patch_language_v.2.3.x\catalog\language\%locale%\%locale%.php
To your language: replace "%locale%" with the name of the language (English, German...).
Step 3: Uploading
Upload admin and catalog folders you replaced into your OpenCart folder
Step 4: Translating
Then please go to catalog => language => your language folder => extension => select files you want to translate
Theme Configuration
Go to Extensions => Modules => Theme Control Panel => Click Edit button. All of parameters of this theme are divided into the following groups, in which they are explained themselves:
Screenshot Backend Settings
General:
General: confiugre create color, change color, pre-loader, back to top, lazyload ...
Header: Choose header type, keep menu, header information: email, telephone number...
Footer: configure to display payment block
Banner Effect: Choose effect to html module
Layout: Layout: choose Layout Style, background color, Overlay pattern, Background Image...
Pages:
Product Listings: configure Refine Search, category
Product Labels: set lables for sale, new, quickview...
Product Page: configure option, style for product page, Enable Product Zoom, Product Zoom Mode...
Fonts: Fonts configure font-family for body, menu, heading
Social Widgets Accounts: Social Widgets Accounts: Configure social widgets that display in left /right (facebook, twitter...)
Custom Code: CSS Input/ CSS File/ JS Input/ JS File
Advanced: Advanced : SCSS Compile, Minify CSS , Minify JS
Sample Data: Sample Data Install data configuration
Horizontal Menu Configuration
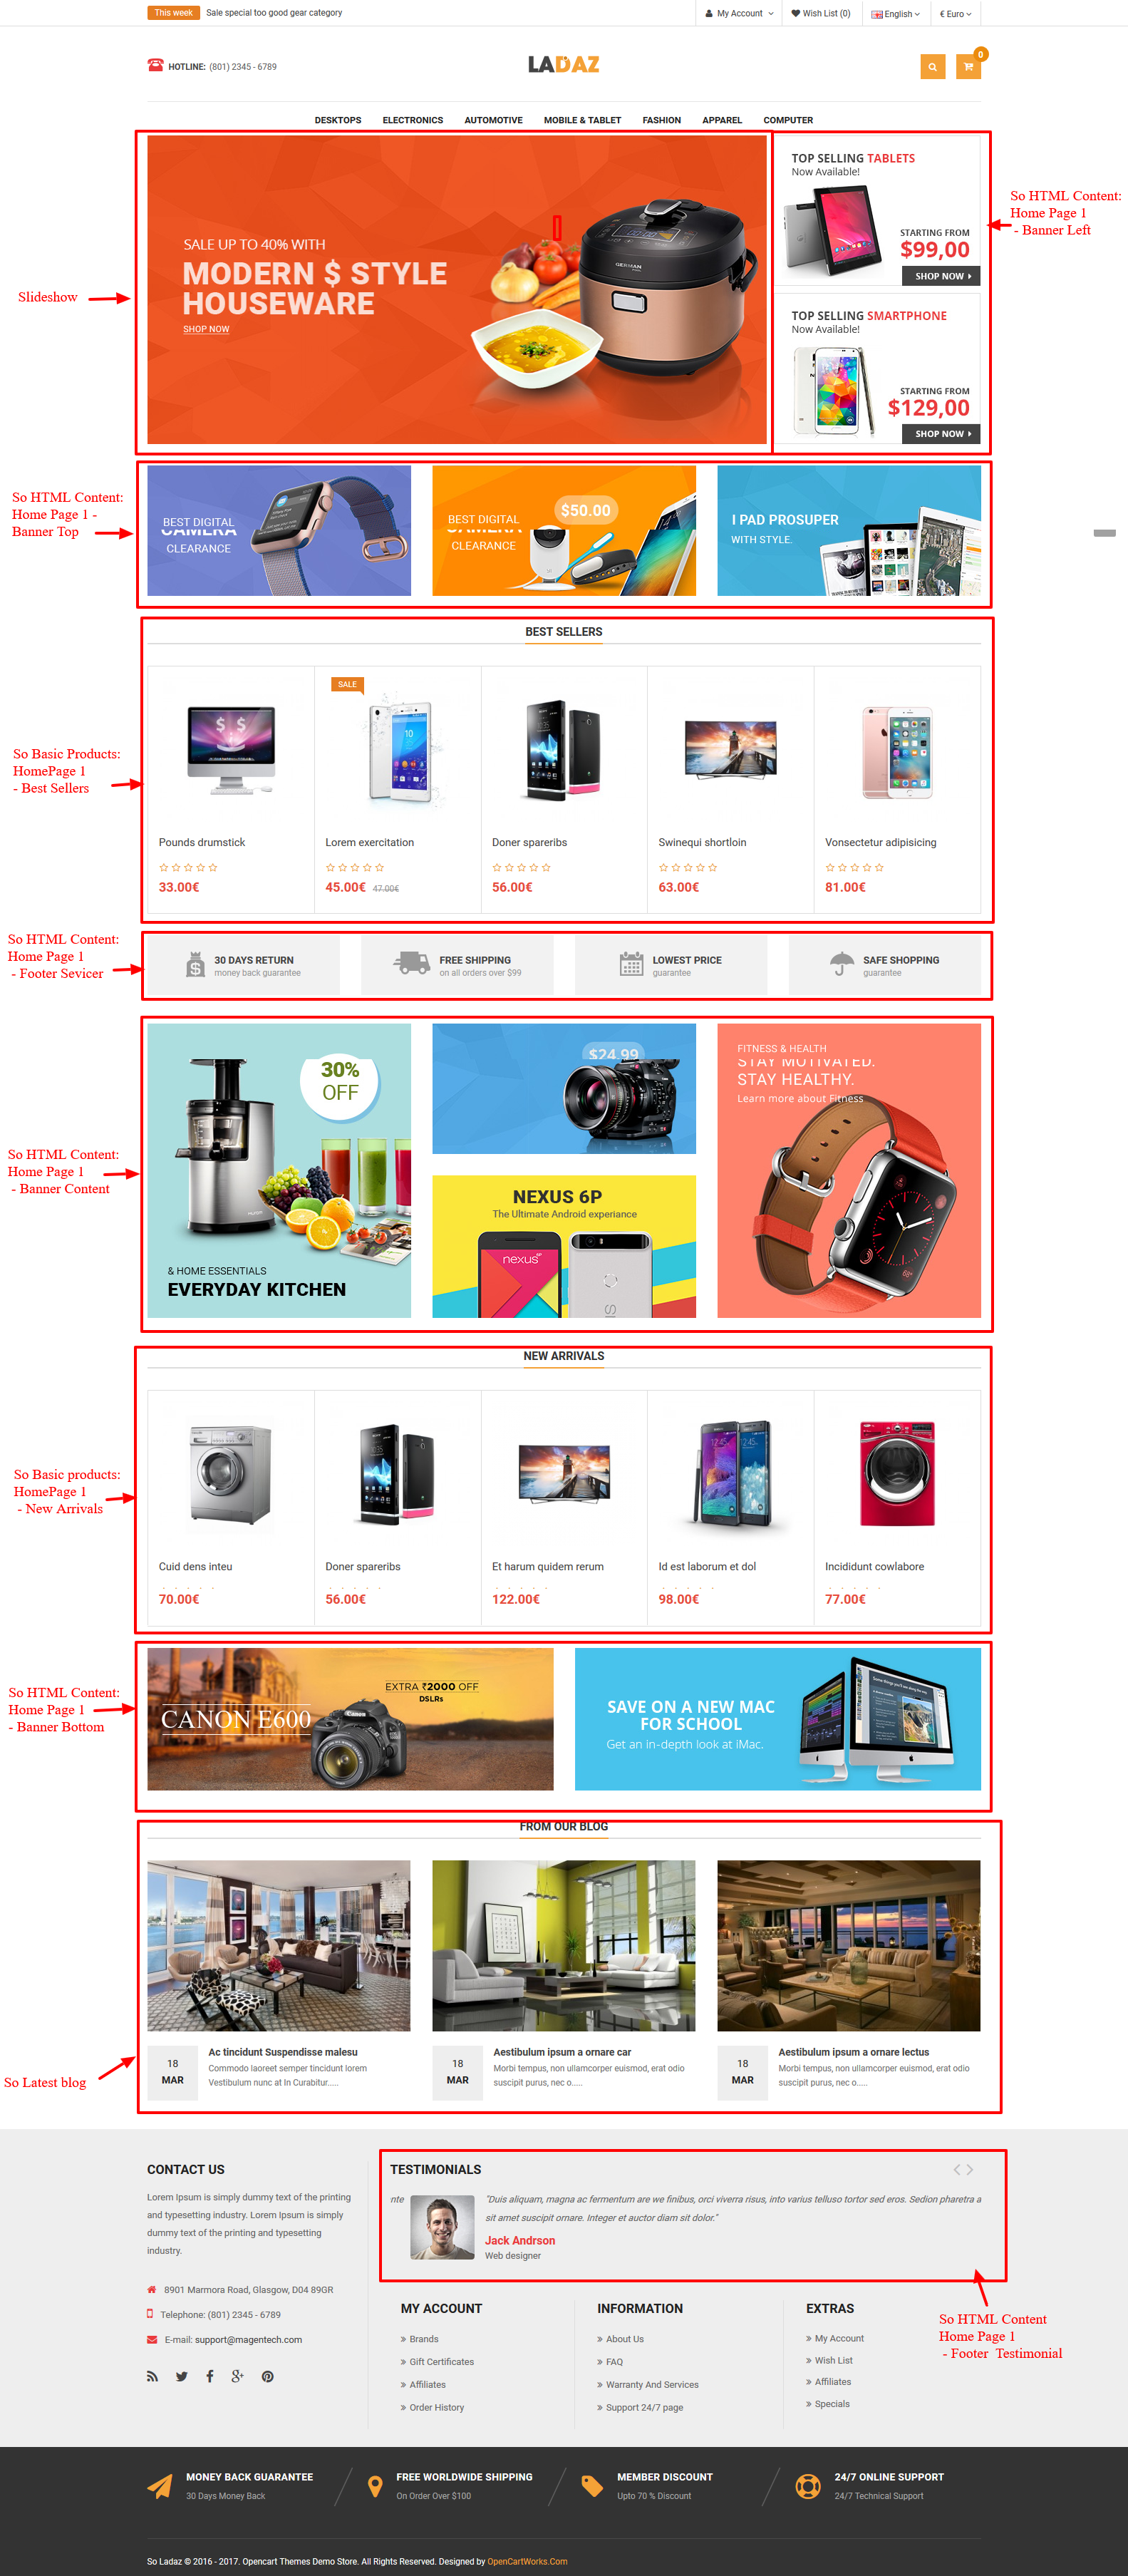
Frontend Appearance

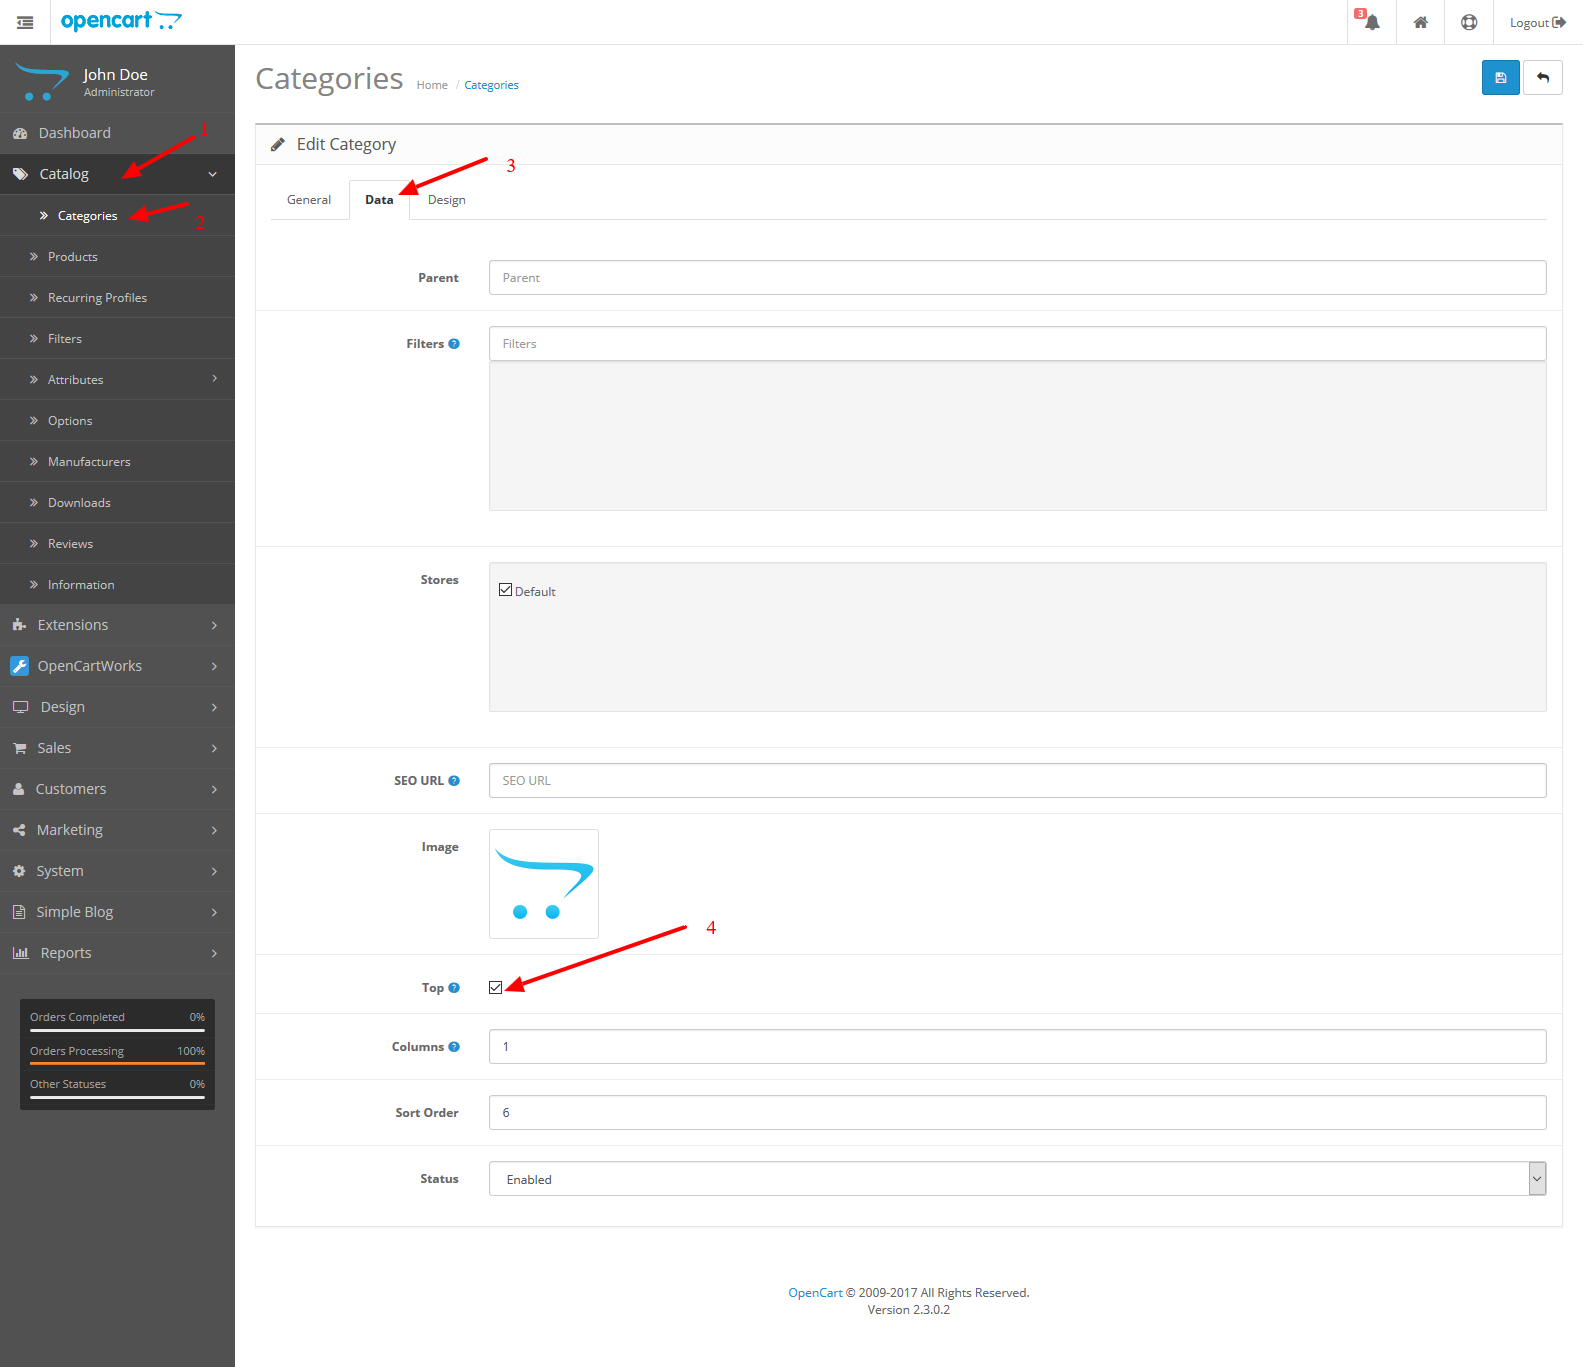
1. Create New Horizontal Menu
Menu will get categories to display in Horizontal Menu
Please go to Catalog => Categories => Edit your category => Click "Data" tab => check on 'Top' option => Then Click Save button
Extension Configuration
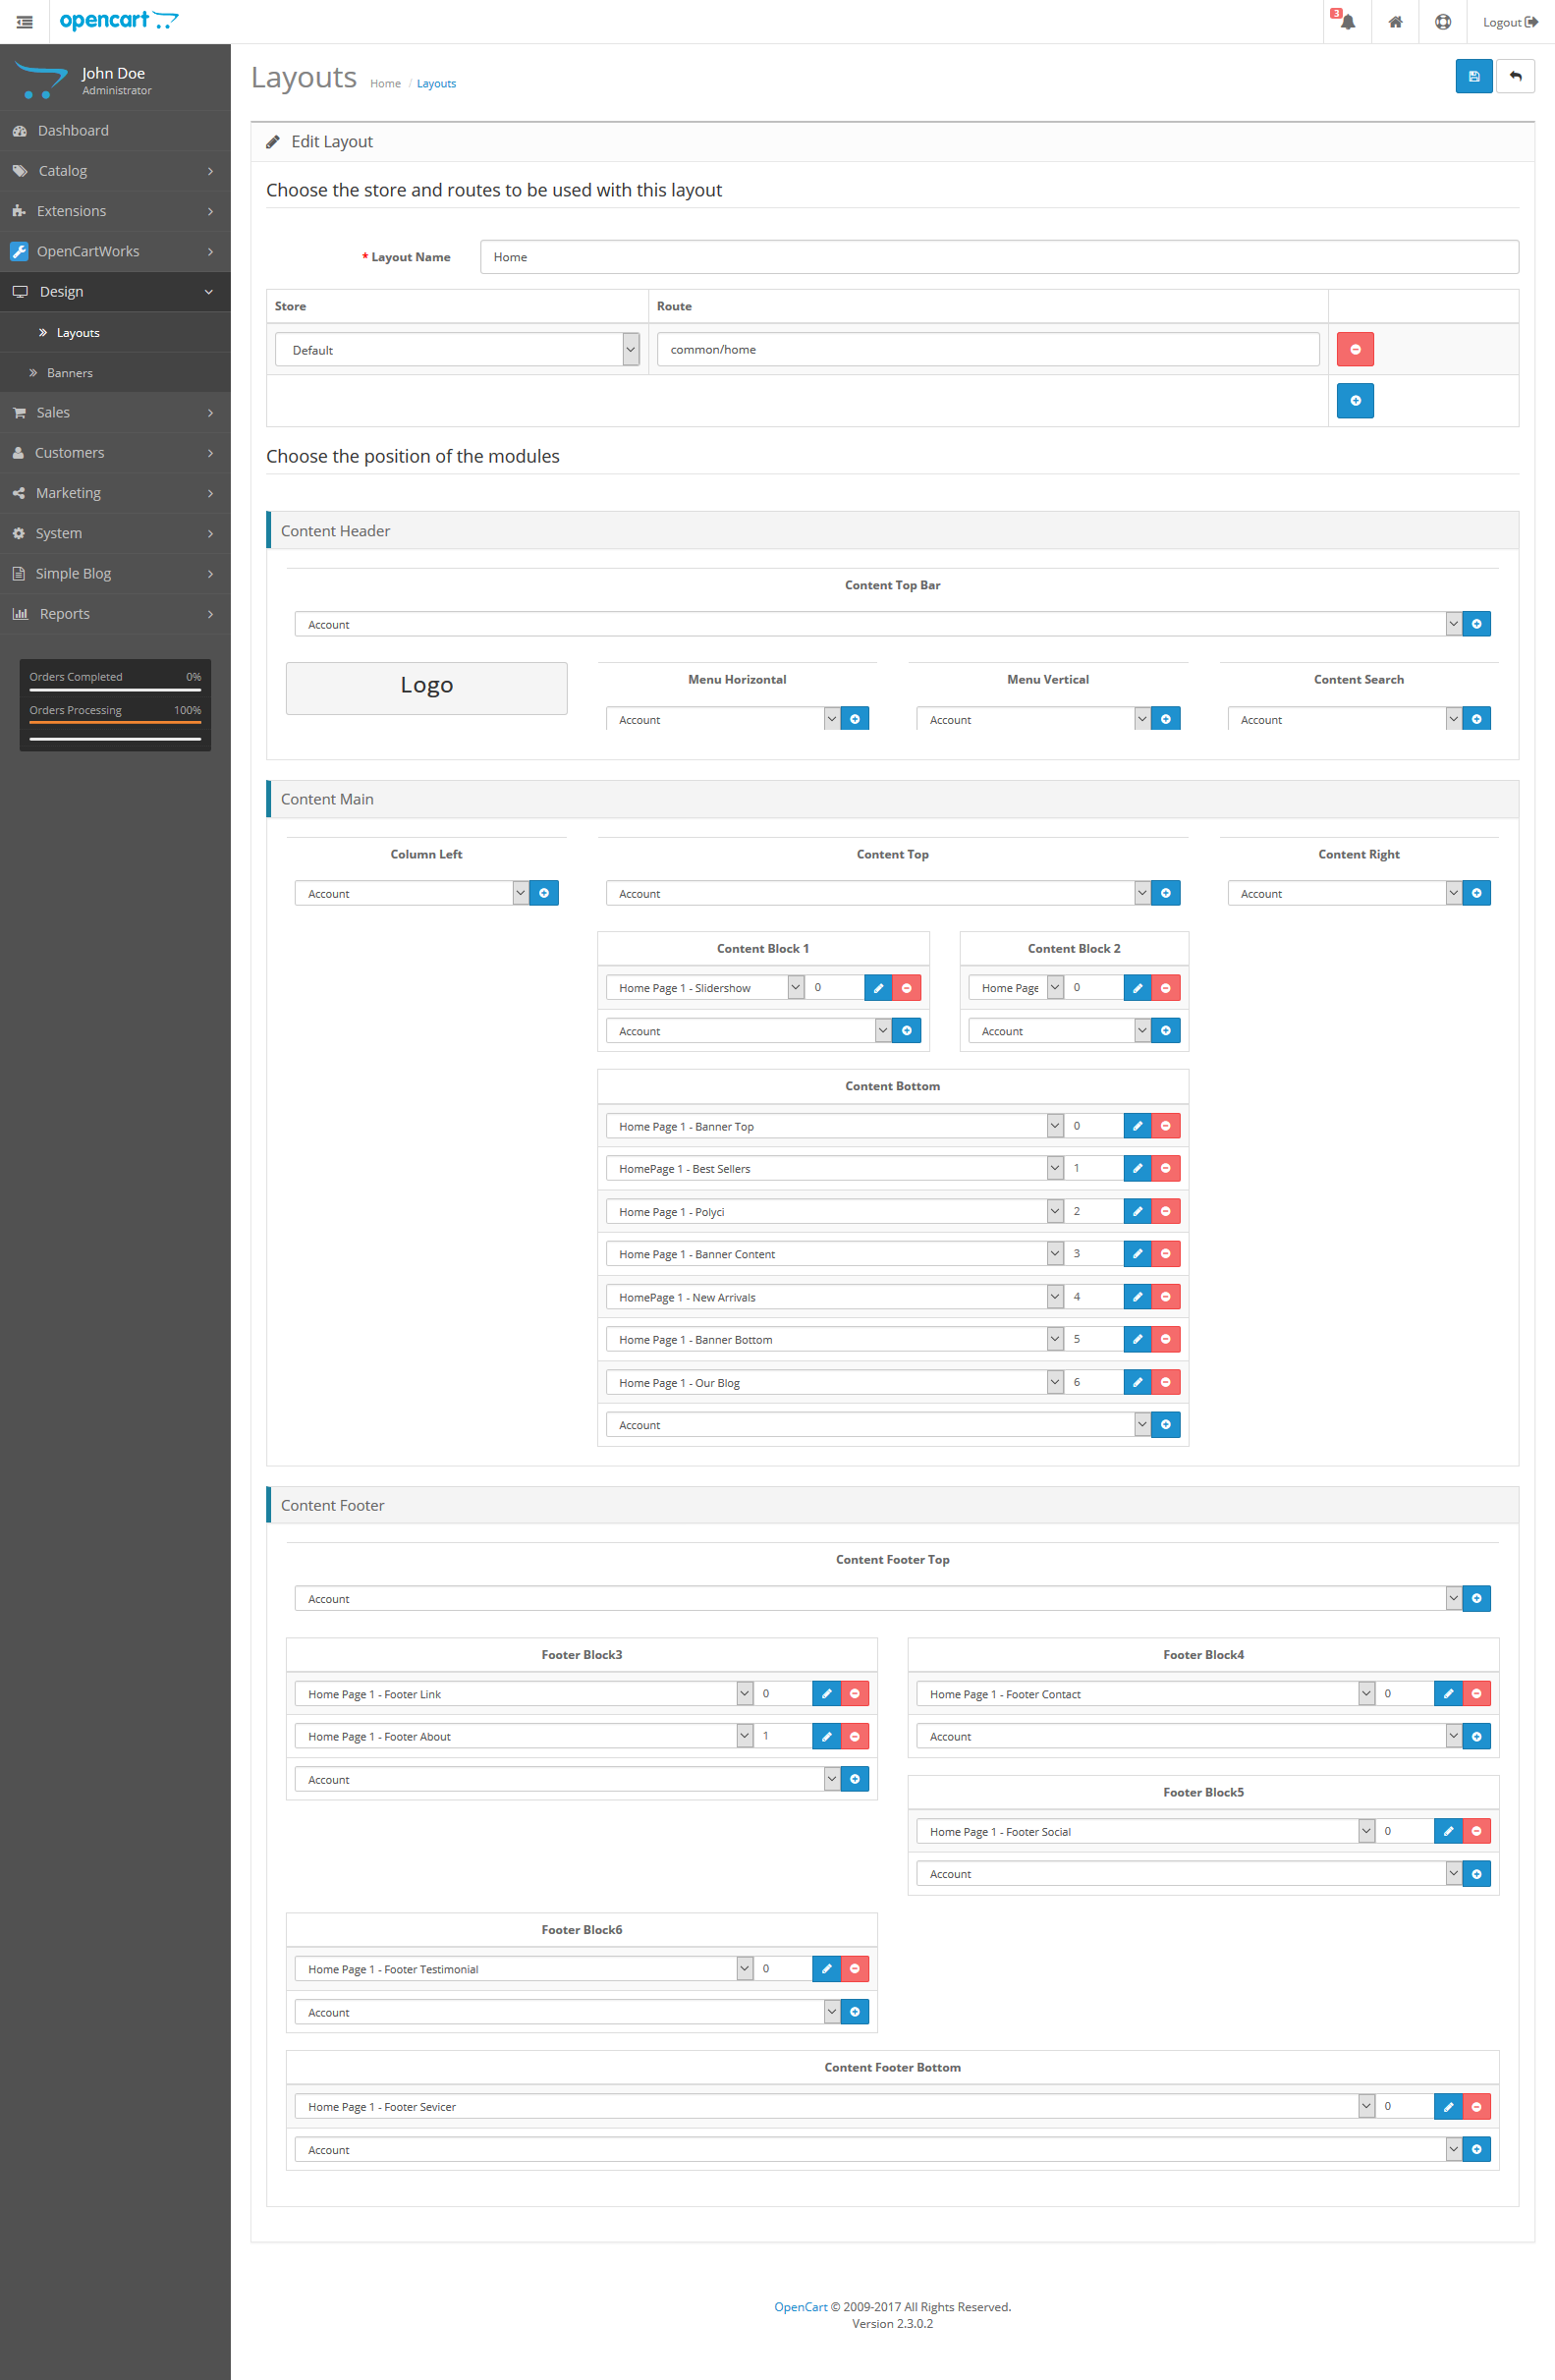
To manager Home layout of your site, please go to Admin >> Designs >> Layouts: Edit Home page
This is screenshot of the layout configuration of Homepage:
There are the way to configure Extensions of this Theme:
Go to Admin Control Panel => Extensions => Extensions => Choose the extension type: Modules => And choose the module you want.
So Ladaz is using extensions:
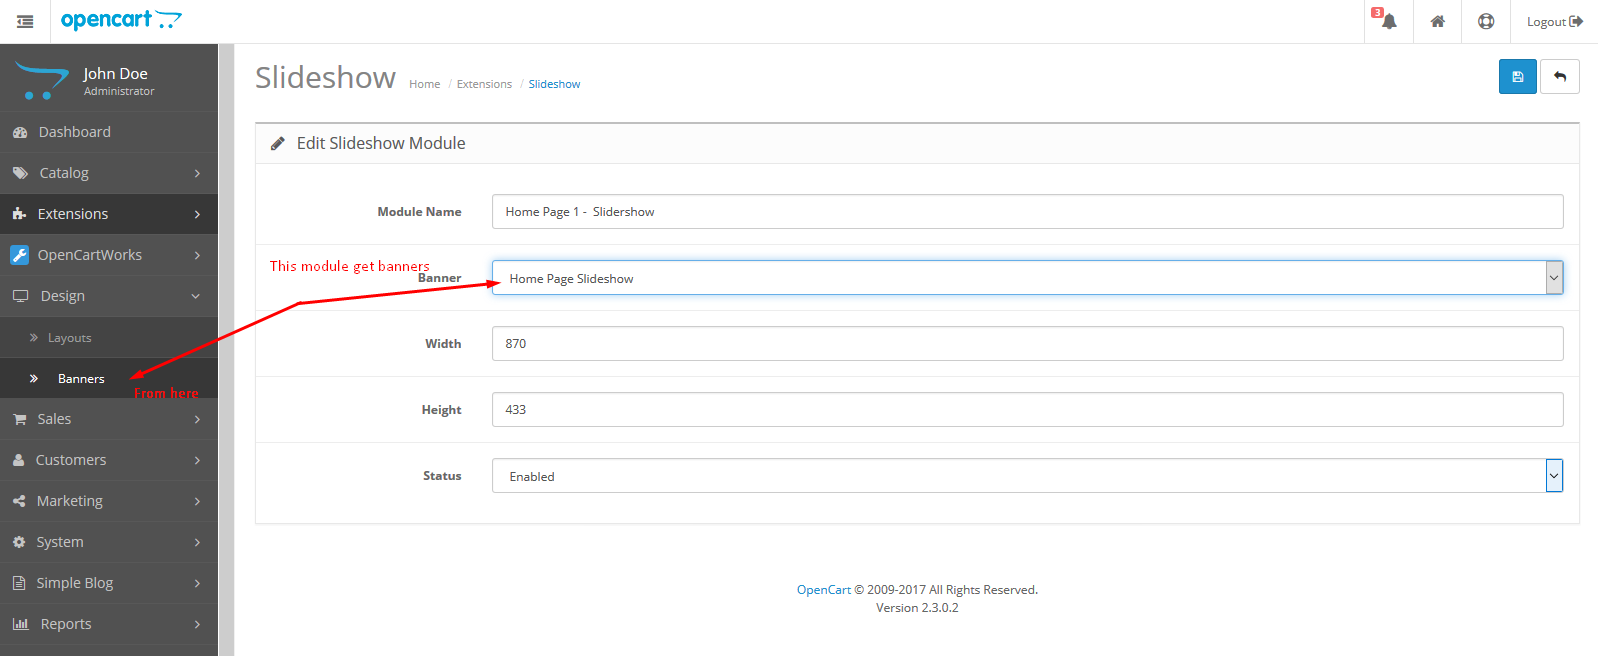
- Slideshow: click edit this module:
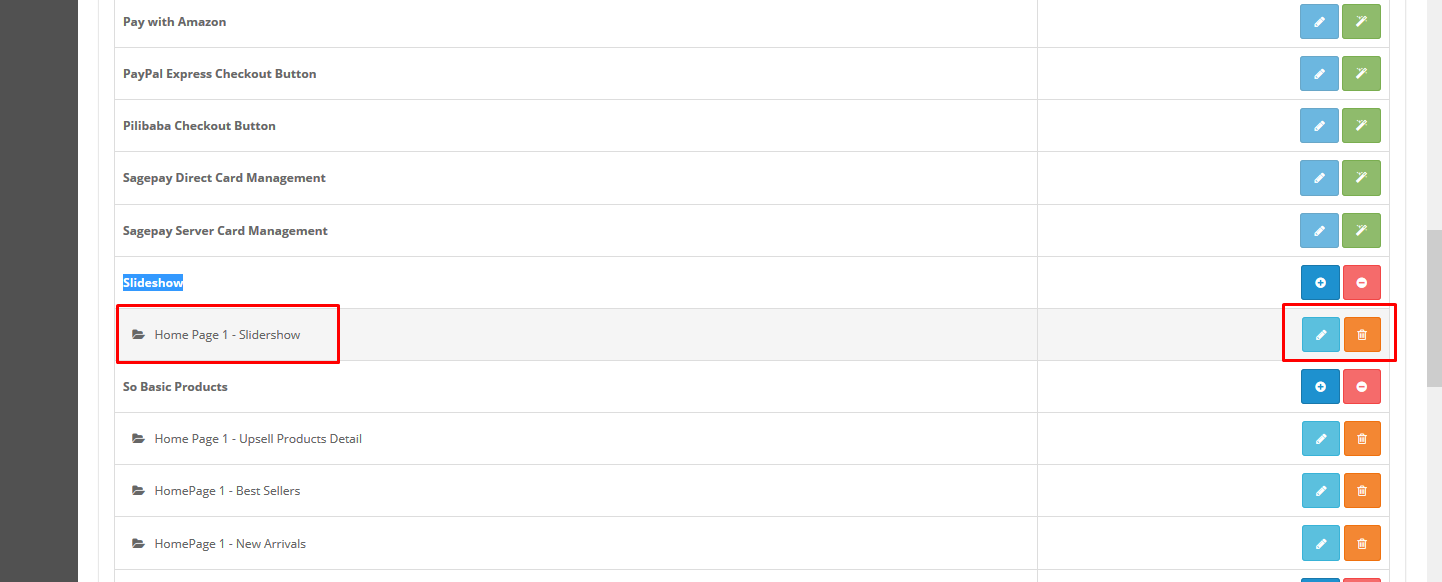
This is configuration of this module:
- So Html Content:: Click edit this module, click 'Code view' button in editor to input html code, after change code, click 'Code view' button again, then Save
Home Page 1 - Banner Bottom
- Code:
			<div class="banner-bottom row">
     <div class="banners">
            <div class="st-1-l col-lg-6 col-md-6 col-sm-6"><a title="Static Image" href="#"><img src="image/catalog/banner/home9/10.jpg" alt="Static Image"></a></div>
            <div class="col-lg-6 col-md-6 col-sm-6"><a title="Static Image" href="#"><img src="image/catalog/banner/home9/11.jpg" alt="Static Image"></a></div>
     </div>
</div>
Home Page 1 - Banner Content
- Code:
			<div class="row box-banner-ct">
    <div class="banners col-lg-4 col-md-4 col-sm-4">
        <div class="banner-ct1">
            <a title="Static Image" href="#"><img src="image/catalog/banner/home9/6.jpg" alt="Image Client"></a>
        </div>
    </div>
    <div class="col-lg-4 col-md-4 col-sm-4">
        <div class="banners box-ct1">
            <div class="banner-ct2">
                <a title="Static Image" href="#"><img src="image/catalog/banner/home9/7.jpg" alt="Image Client"></a>
            </div>
            <div class="banners banner-ct3">
                <a title="Static Image" href="#"><img src="image/catalog/banner/home9/8.jpg" alt="Image Client"></a>
            </div>
        </div>
    </div>
    <div class="banners col-lg-4 col-md-4 col-sm-4">
        <div class=" banner-ct4">
            <a title="Static Image" href="#"><img src="image/catalog/banner/home9/9.jpg" alt="Image Client"></a>
        </div>
    </div>
</div>
Home Page 1 - Banner Left
- Code:
			<div class="banner-l">
    <div class="banners">
    <div class="col-s-1"><a title="Static Image" href="#"><img src="image/catalog/banner/home9/1.jpg" alt="Static Image"></a></div>
    <div class="col-s-2"><a title="Static Image" href="#"><img src="image/catalog/banner/home9/2.jpg" alt="Static Image"></a></div>
    </div>
</div>
Home Page 1 - Banner Top
- Code:
			<div class="banner-top row">
    <div class="banners">
        <div class="st-1-l col-lg-4 col-md-4 col-sm-4"><a title="Static Image" href="#"><img src="image/catalog/banner/home9/3.jpg" alt="Static Image"></a></div>
        <div class="col-lg-4 col-md-4 col-sm-4"><a title="Static Image" href="#"><img src="image/catalog/banner/home9/4.jpg" alt="Static Image"></a></div>
        <div class="st-1-r col-lg-4 col-md-4 col-sm-4"><a title="Static Image" href="#"><img src="image/catalog/banner/home9/5.jpg" alt="Static Image"></a></div>
    </div>
</div>
Home Page 1 - Footer Testimonial
- Code:
<h3 class="modtitle">TESTIMONIALS</h3>

<div class="block clients_say">
 <div class="slider-clients-say">
 <div class="block_content">
 <div class="info">
 <div class="image"><img src="image/catalog/cms/img-clien-2.png" alt="banner"></div>
 <div class="content-if">
 <div class="text">"Duis aliquam, magna ac fermentum are we finibus, orci viverra risus, into varius telluso tortor sed eros. Sedion pharetra ante sit amet suscipit ornare. Integer et auctor diam sit dolor."</div>
 <div class="author">Jack Andrson</div>
 <p class="name-if font-sn">Web designer</p>
 </div>
 </div>
 </div>
 <div class="block_content">
 <div class="info">
 <div class="image"><img src="image/catalog/cms/img-clien-3.png" alt="banner"></div>
 <div class="content-if">
 <div class="text">"Duis aliquam, magna ac fermentum are we finibus, orci viverra risus, into varius telluso tortor sed eros. Sedion pharetra ante sit amet suscipit ornare. Integer et auctor diam sit dolor."</div>
 <div class="author">Aliquam Tellus</div>
 <p class="name-if font-sn">Ornare Mauris</p>
 </div>
 </div>
 </div>
 <div class="block_content">
 <div class="info">
 <div class="image"><img src="image/catalog/cms/img-clien.png" alt="banner"></div>
 <div class="content-if">
 <div class="text">"Duis aliquam, magna ac fermentum are we finibus, orci viverra risus, into varius telluso tortor sed eros. Sedion pharetra ante sit amet suscipit ornare. Integer et auctor diam sit dolor."</div>
 <div class="author">Jack Andrson</div>
 <p class="name-if font-sn">Web designer</p>
 </div>
 </div>
 </div>

 </div>
</div>

Perform bulk operations on your HTML document on any HTML tag. Choose to replace, delete the whole block, delete only the tag or delete the tag attributes only of the selected tags.
Home Page 1 - Footer Sevicer
- Code:
			<div class="box-bottom-support">
 <div class="row">
 <div class="col-lg-3 col-md-3 col-sm-6 box-1">
 <div class="icon-sp">
 <i class="fa fa-paper-plane"></i>
 </div>
 <div class="content-sp">
 <a href="#" class="font-sn"><strong>Money Back Guarantee</strong></a><br>
 <span>30 Days Money Back</span>
 </div>
 </div>

 <div class="col-lg-3 col-md-3 col-sm-6 box-1 box-footer-sp">
 <div class="icon-sp">
 <i class="fa fa-map-marker"></i>
 </div>
 <div class="content-sp">
 <a href="#" class="font-sn"><strong>Free Worldwide Shipping</strong></a><br>
 <span>On Order Over $100</span>
 </div>
 </div>
 <div class="col-lg-3 col-md-3 col-sm-6 box-1 box-footer-sp">
 <div class="icon-sp">
 <i class="fa fa-tag"></i>
 </div>
 <div class="content-sp">
 <a href="#" class="font-sn"><strong>Member Discount</strong></a><br>
 <span>Upto 70 % Discount</span>
 </div>
 </div>

 <div class="col-lg-3 col-md-3 col-sm-6 box-1 box-footer-sp">
 <div class="icon-sp">
 <i class="fa fa-life-ring"></i>
 </div>
 <div class="content-sp">
 <a href="#" class="font-sn"><strong>24/7 Online Support</strong></a><br>
 <span>24/7 Technical Support</span>
 </div>
 </div>
 </div>
</div>
Home Page 1 - Footer About
- Code:
			<div class="content-block-footer font-sn"><div class="footer-logo">
    <img src="image/catalog/cms/logo-index8.png" alt=""> </div>
    <p>8901 Marmora Road, Glasgow, D04 89GR / Telephone: (801) 2345 - 6789<br>
    E-mail: support@magentechthemes.com</p>
</div>
<ul class="social-block ">
    <li class="rss"><a class="_blank" href="#" target="_blank"><i class="fa fa-rss"></i></a></li>

    <li class="twitter"><a class="_blank" href="https://twitter.com/smartaddons" target="_blank"><i class="fa fa-twitter"></i></a></li>

    <li class="facebook"><a class="_blank" href="https://www.facebook.com/MagenTech" target="_blank"><i class="fa fa-facebook"></i></a></li>

    <li class="google_plus"><a class="_blank" href="https://plus.google.com/u/0/+Smartaddons/posts" target="_blank"><i class="fa  fa-google-plus"></i></a></li>

    <li class="pinterest"><a class="_blank" href="https://www.pinterest.com/smartaddons/" target="_blank"><i class="fa fa-pinterest"></i></a></li>
</ul>
Home Page 1 - Footer Contact
- Code:
			 <div class="content-block-footer">
<h3 class="modtitle">CONTACT US</h3>


<p class="des-ft">Lorem Ipsum is simply dummy text of the printing and typesetting industry. Lorem Ipsum is simply dummy text of the printing and typesetting industry.</p>


</div>

<div class="footer-contact-content block-content">
<p class="address"><i class="fa fa-home"></i><span>8901 Marmora Road, Glasgow, D04 89GR</span></p>
<p class="phone"><i class="fa fa-mobile"></i><span>Telephone: (801) 2345 - 6789</span></p>
<p class="email"><i class="fa fa-envelope"></i><span>E-mail: <a title="Mail to: demo@furnicom.com" href="mailto:name@email.com">support@magentech.com</a></span></p>
</div>
- So Basic Product: You need choose categories for this module then save in module configuration. Click here to read user guide
- So Latest Blog: Please install Simple blog, then create blog categories, articles... Then in this module, please choose categories. Click here to read user guide
Copyright
To remove Designed by Opencartworks.Com at the footer of theme, please purchase our Copyright Removal here
Support
If you have any question that is beyond the scope of this help file, please send us via: Submit a Ticket
Thank you so much for purchasing this theme!